Getting started
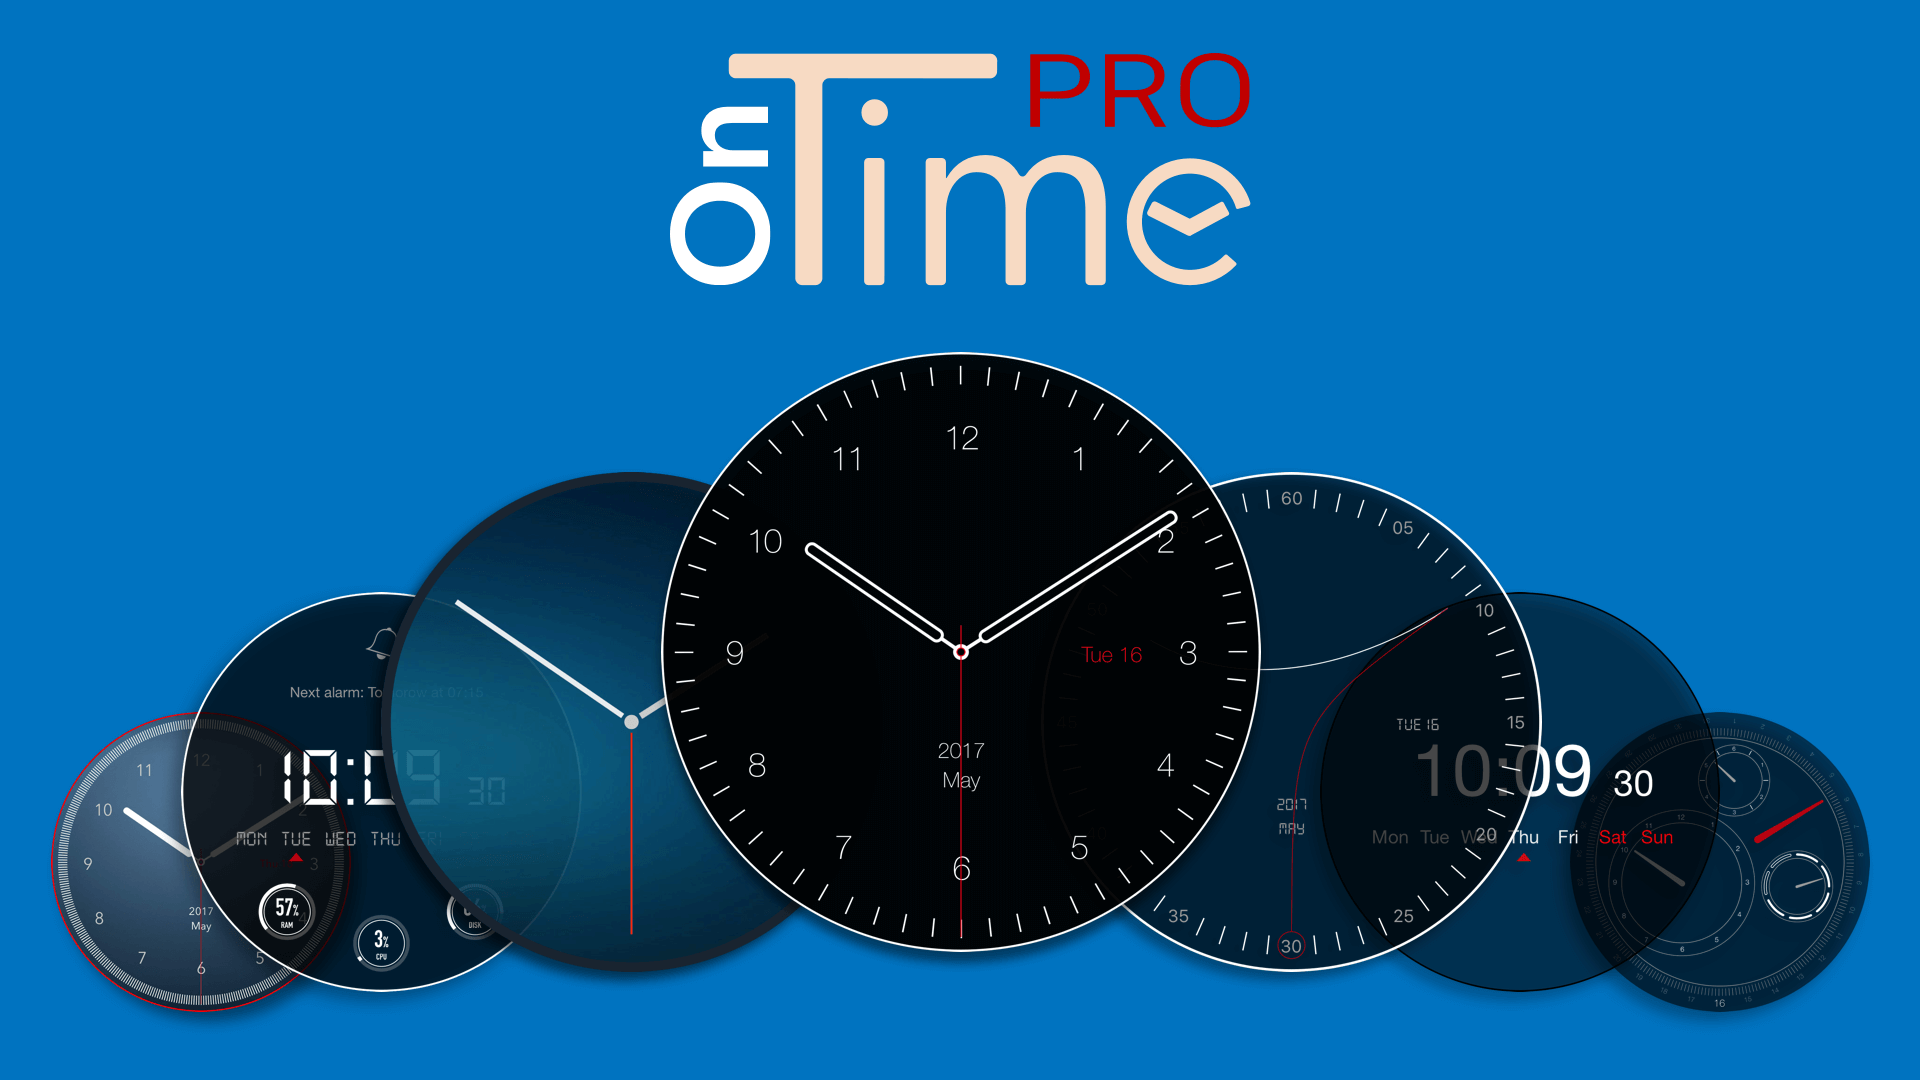
OnTime lets you create fully customizable unlimited timepieces
Key features:
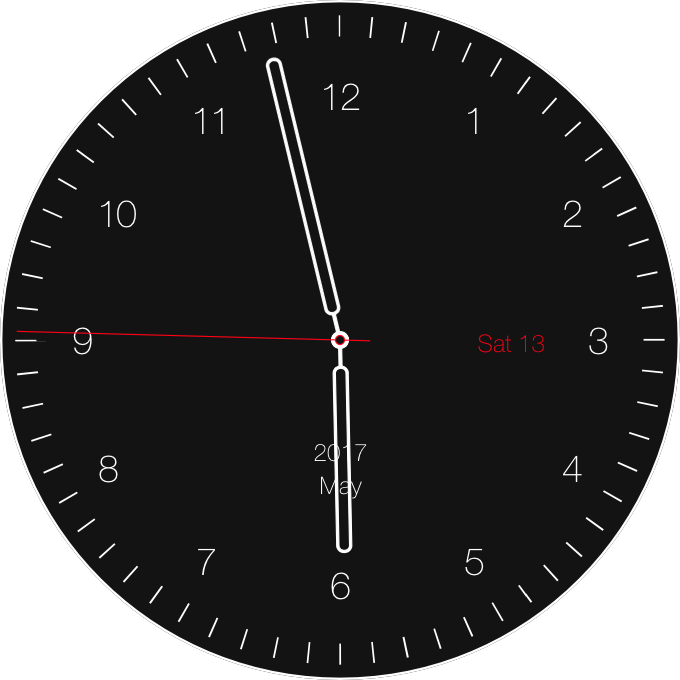
Clock:
- Customize any clock element
- Switch between analog, digital and fantasy clock
- Choose between multiple analog hands
- Customize the background clock with
- Unlimited colors
- Unlimited gradients
- Personal pictures
- Animated movements
- Set custom time offset
Alarm
- Set alarm to play ringtones, vocal messages or both
- Customize your alarms sound
- Progressive volume
- Unlimited alarms
World clock
- Realtime sunset and sunrise
- Unlimited world clocks
- Clock background automatically changes with day or night color schemes
- Show world clocks from menu bar
- Time differences calculator
Break time
- Manage your breaks
- Force yourself to take a break
- Schedule for breaks
- Diffent apperarence for breaks
- Exceptions
Smart quotes
- Random quotes
- Quiet hours
First launch
When the app first launches, a clock with the default theme will appear on your screen.
This is the default interface. You can place the clock in the position you want by clicking and dragging it.
Also, on the first launch you will see a welcome window with a simple step by step tutorial which will guide you trough setting up of a few things. You can skip this tutorial, and configure the app's behavior later.
Fast menu settings
OnTime provides a simple menu that allows you to acces Preferences or to quickly set up a few things.

- Preferences - Enter application's preferences
- Arrange clock - Will change the behavior of the whindow.
- On Top - OnTime will be on top of of all other windows.
- Normal - OnTime will have same behavior as any other window.
- Behind - OnTime will remain behind any other window.
- Lock position - Will lock OnTime on the screen without the posibility of dragging it to reposition
- Center clock - Will place OnTime on the center of the screen.
- Rate OnTime - Will open the AppStore to rate OnTime.
- Quit - Close OnTime.
Accesing preferences
To achieve the real power of the app you must enter in the preferences panel. There are two options available to acces the panel:
- Right click on clock, and select Preferences from the popover
- Click on icon from MenuBar, and select Preferences from the popover
Customize section

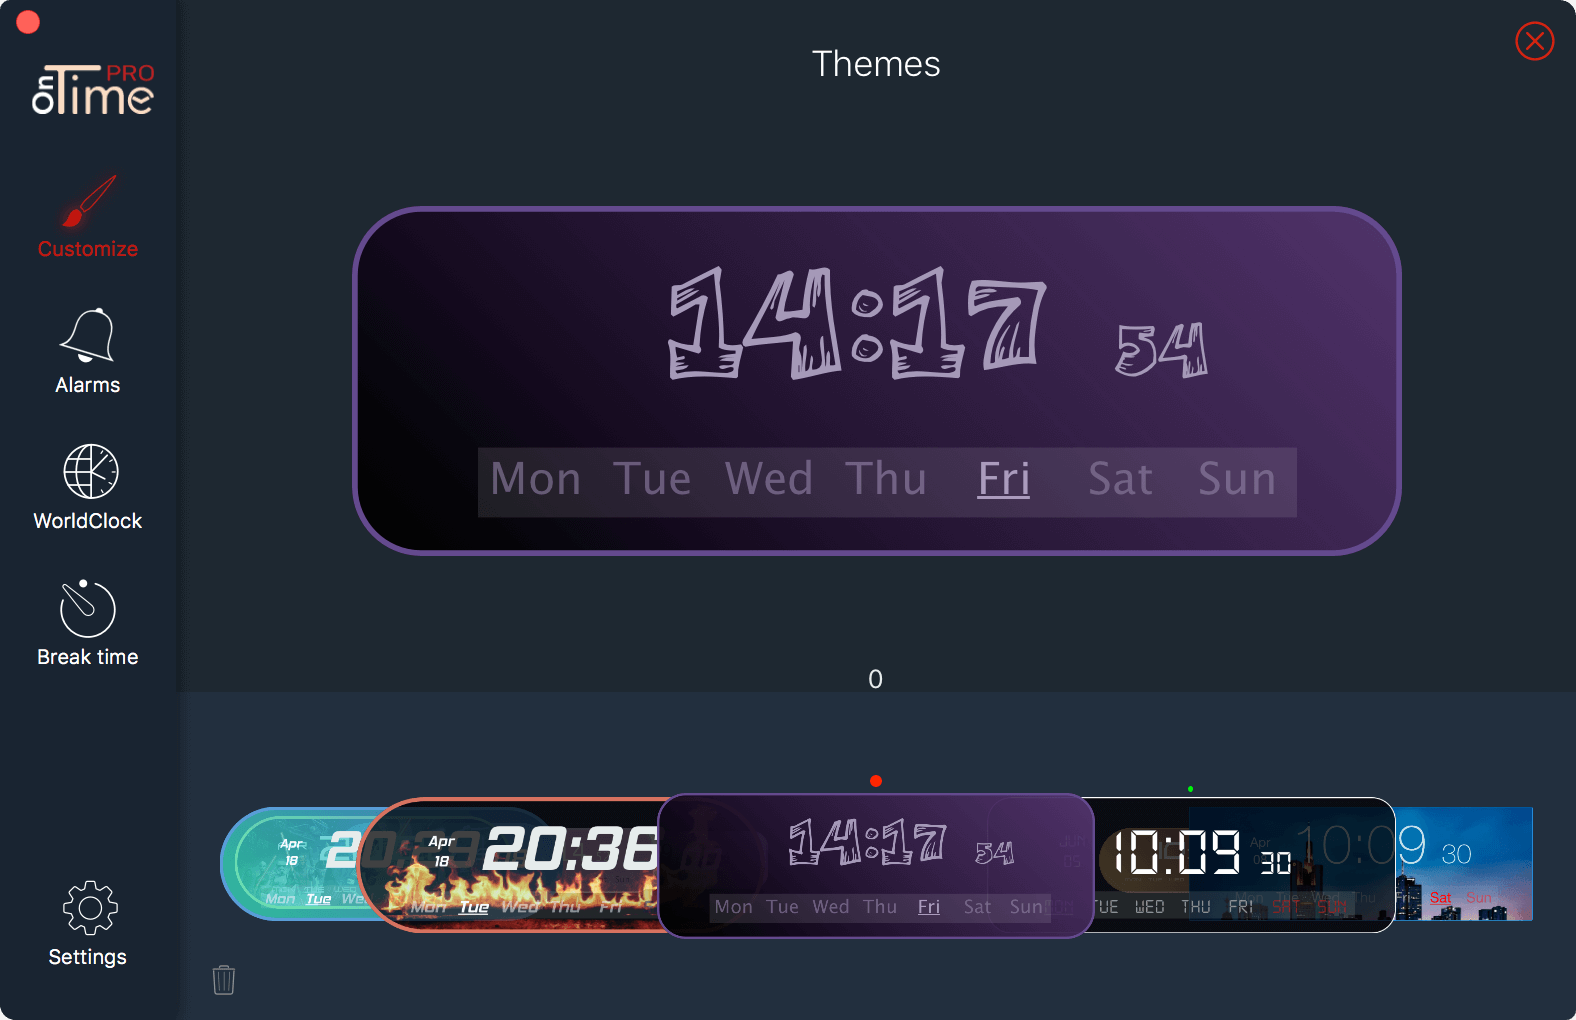
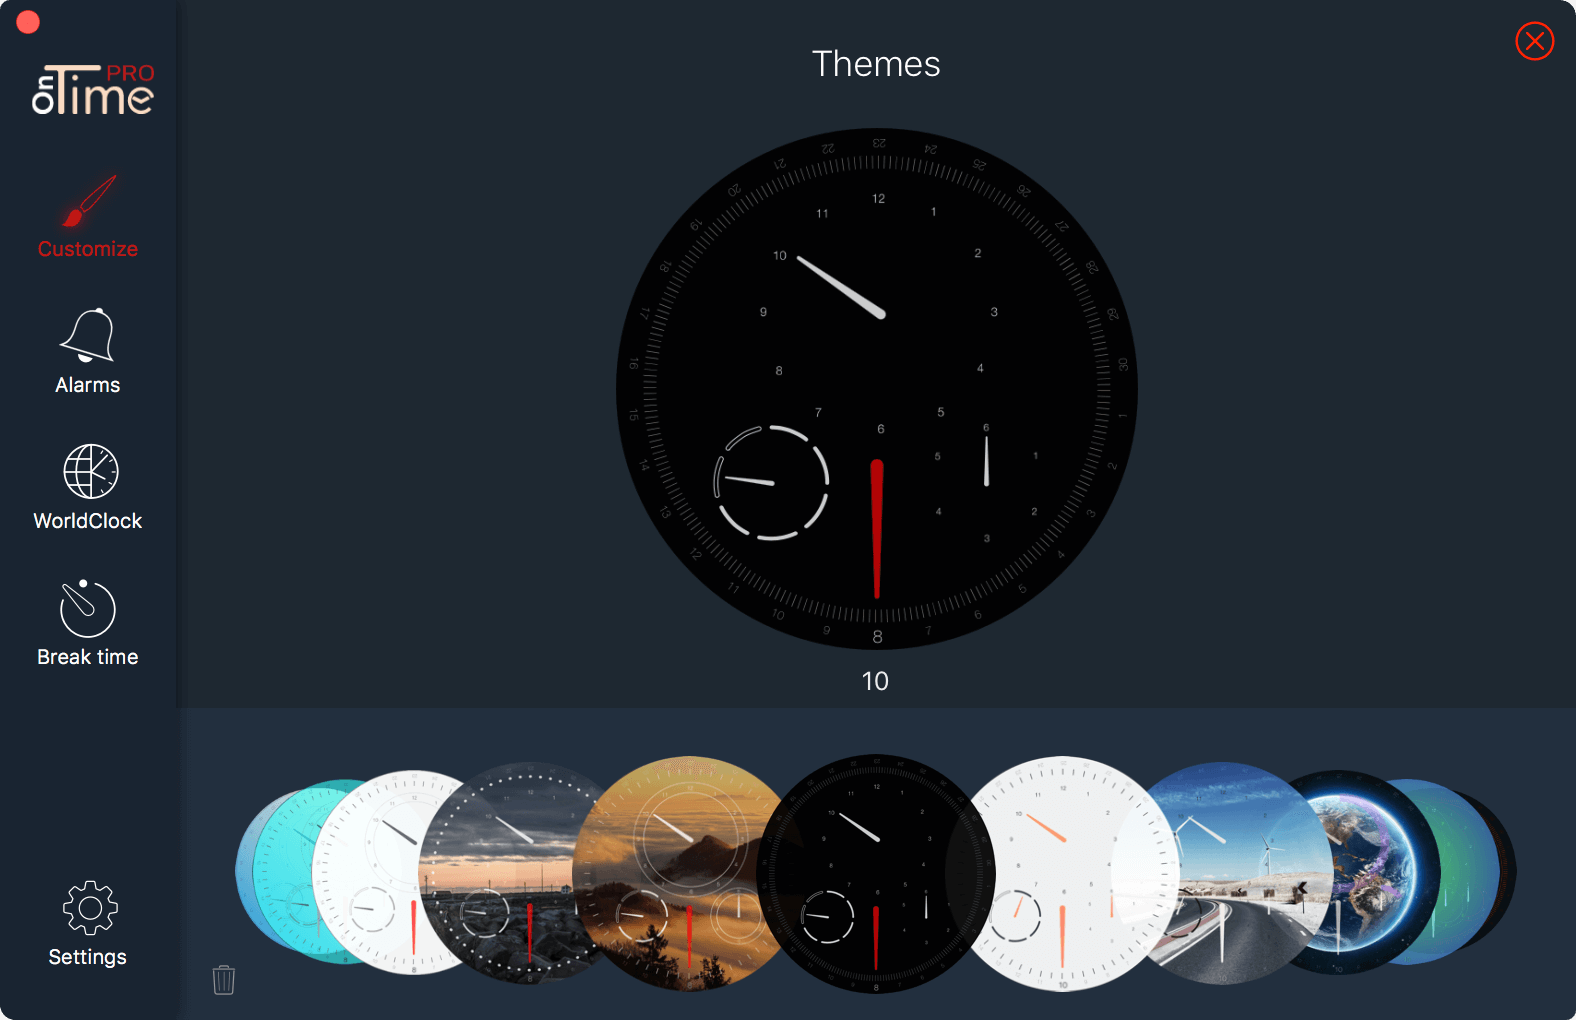
On the left side of preferences panel you can find the main features of the OnTime. The first one, Customize, allows you to choose between a few types of clocks. Use the arrow buttons to select your desired template and customize it how you wish or select an already saved theme.
Customize Analog
To make a change, you firstly must select the element you want to modify. Move the cursor over the model and click on an element to select it.
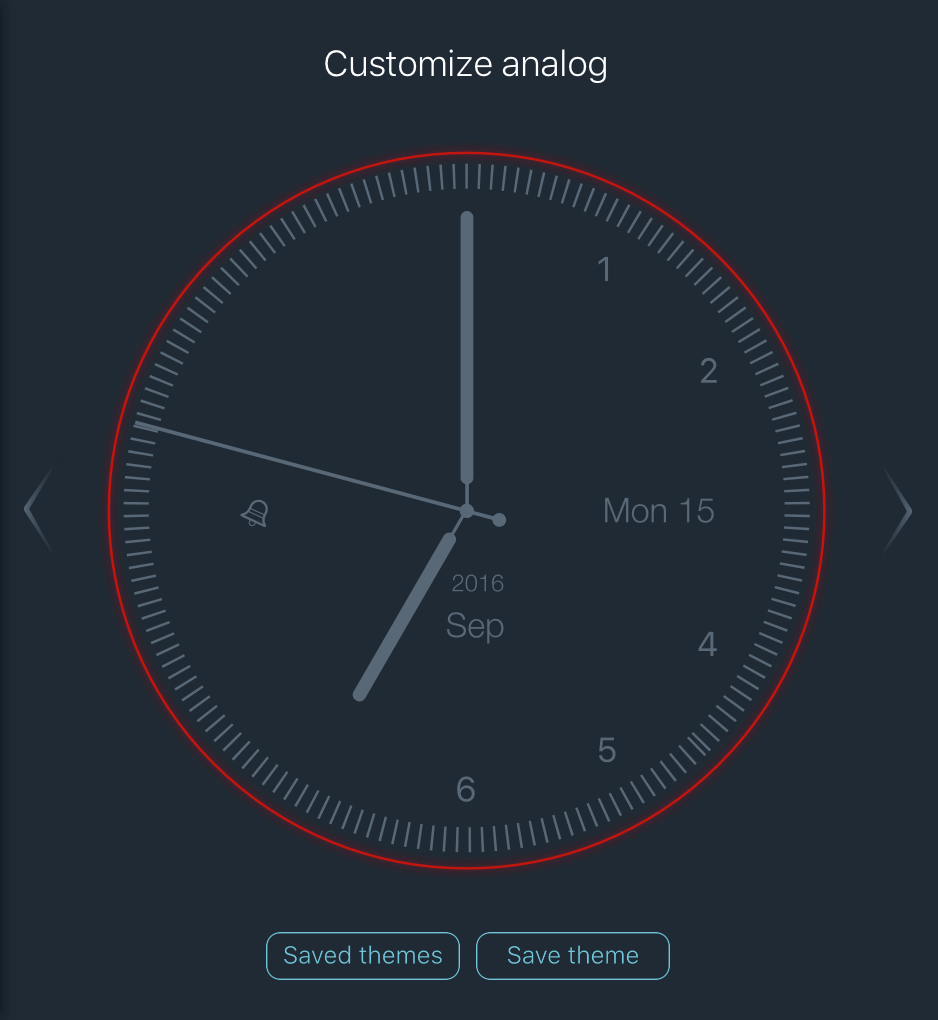
Here are the available parts to select for Analog clock:
Border:
- Color - Change the color of the border line
- Radius - Change the corner radius of the clock.
- Width - Change the border width
Ticks
- Show - Show or hide ticks
- Color - Change ticks color
- Style - Choose between Lines and Dots ticks style
- Count - Select how many ticks do you want to be drawn on clokc
- Animate - Choose which hand do you want to be fallow if animation is active. Choose None if you don't want to animate ticks.
- Color - Coose the color for active animation.
Numbers
- Show - Show or hide numbers
- Color - Change numbers color
- Type - Choose between Arab or Roman numers style
- Font - Select desired font for display numbers
- Size - Change the size of numbers. (When ticks are not shown you may want a bigger numbers)
Alarms
- Show - Show or hide the bell icon from clock
- Color - Change bell color Note: The bell will be visible only if at least one alarm is enabled.
Date
- Day - Check the box if you want the current day to be shown, and select its color
- Month - Check the box if you want the current month to be shown, and select its color
- Year - Check the box if you want the current year to be shown, and select its color
- Font - Select your favourite font to display the date
Hours
- Show< - Show or hide hours hand
- Color - Change hours hand color
- Select a hand style - Choose the style for all clock hands
Minutes
- Show - Show or hide minutes hand
- Color - Change minutes hand color
- Select a hand style - Choose the style for all clock hands
Seconds
- Show - Show or hide seconds hand
- Color - Change seconds hand color
- Animation - Choose between Continous or Ticking movement style
Background and size
- Enabled - Show or hide clock background
- Type - Choose your favourite background style:
- Color - The background will be filled with a solid color
- Gradient - You can choose 2 colors to create a custom gradient
- Image - Choose any image from your computer, edit and crop it
- Opacity - Choose the opacity level for OnTime background
- Clock size - Change the size of the clock.You can also change the size by using a pinch gesture on the clock.
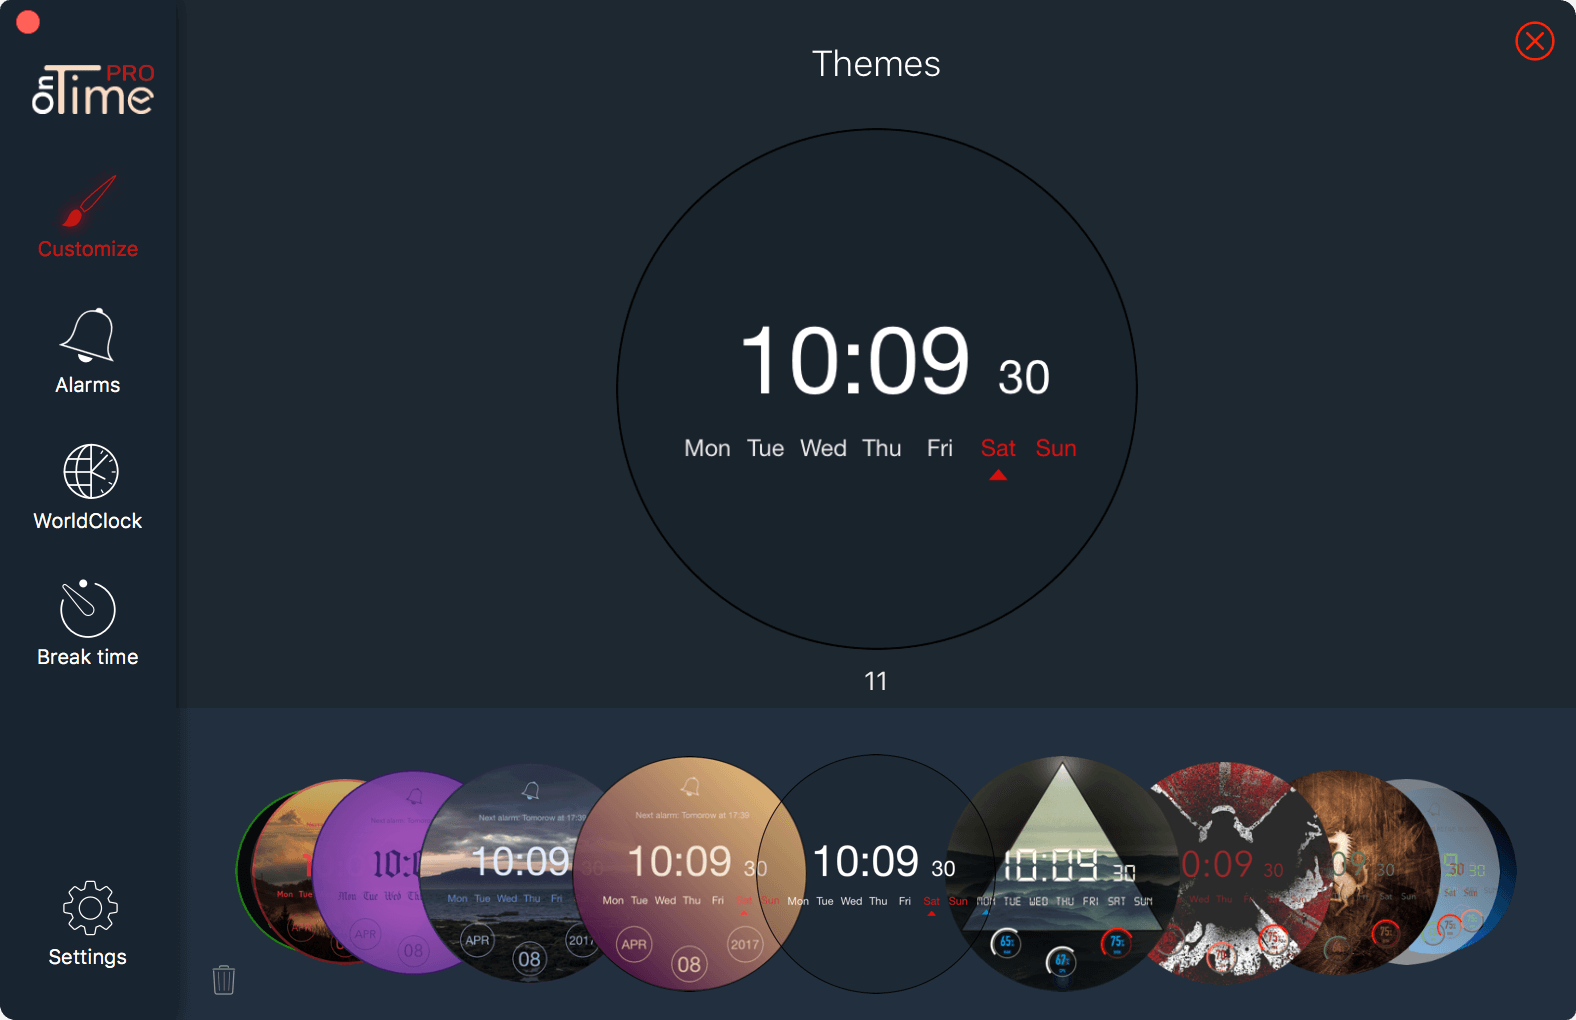
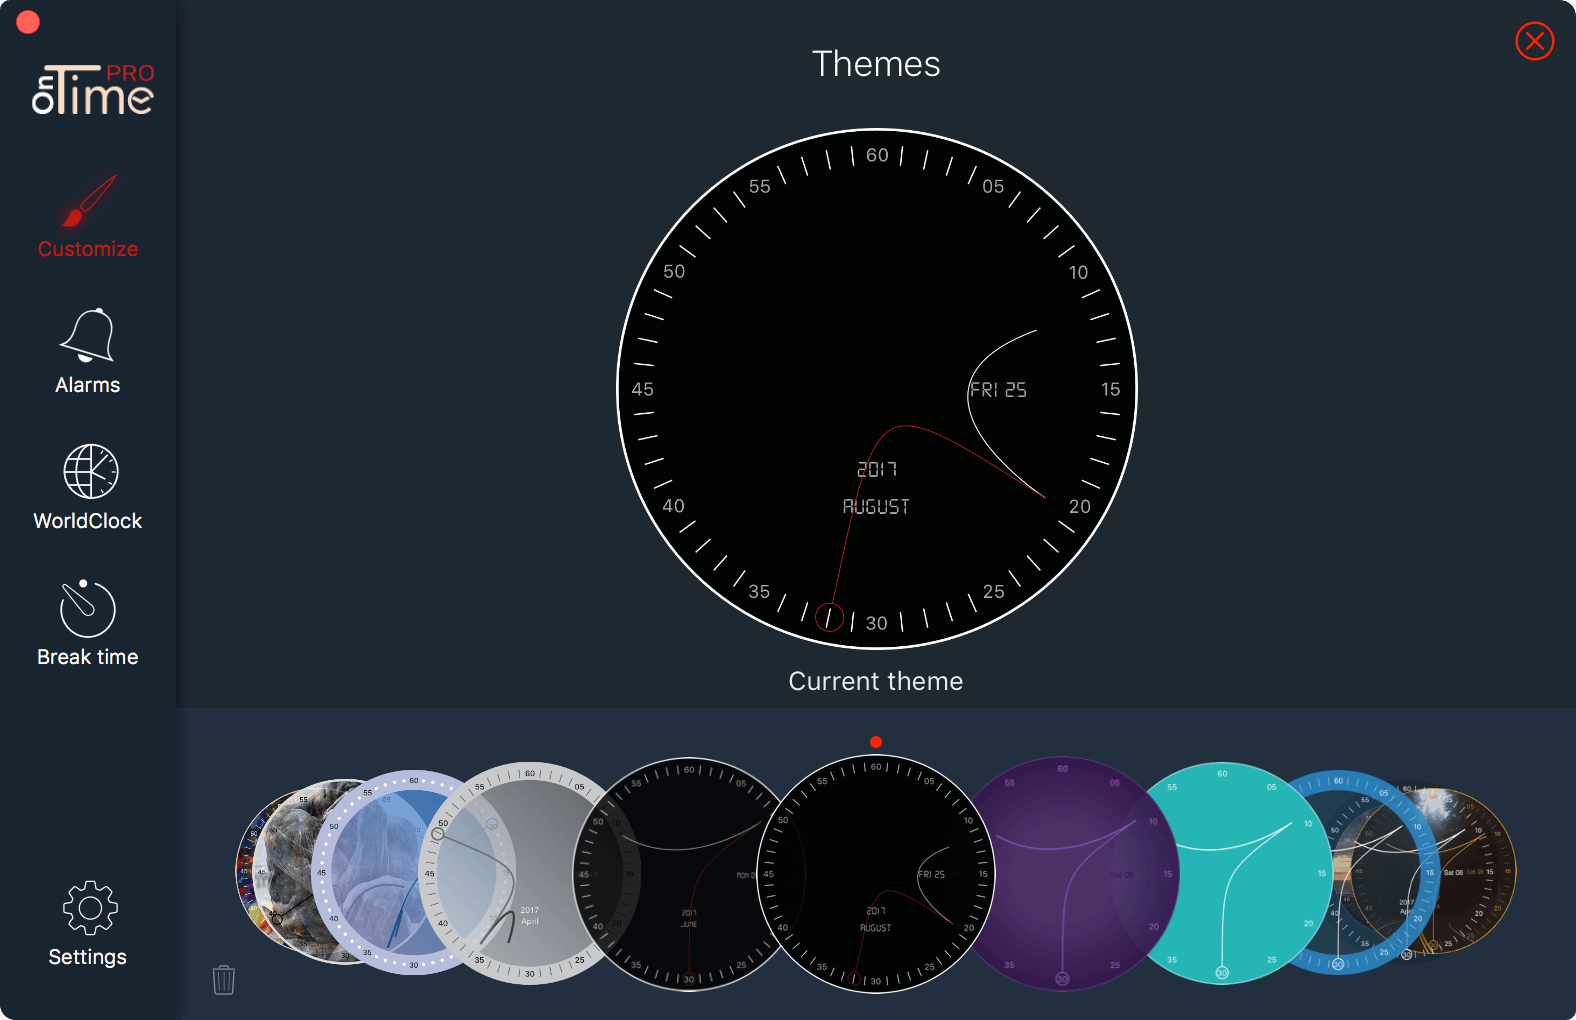
Save a theme
After you have modified the clock in the way that you wanted, you can save the current theme of the clock for later use by pressing Save theme button. Choose a name for your theme and click on save button.
Load a saved theme
Click on Saved themes to see all saved themes and apply one.
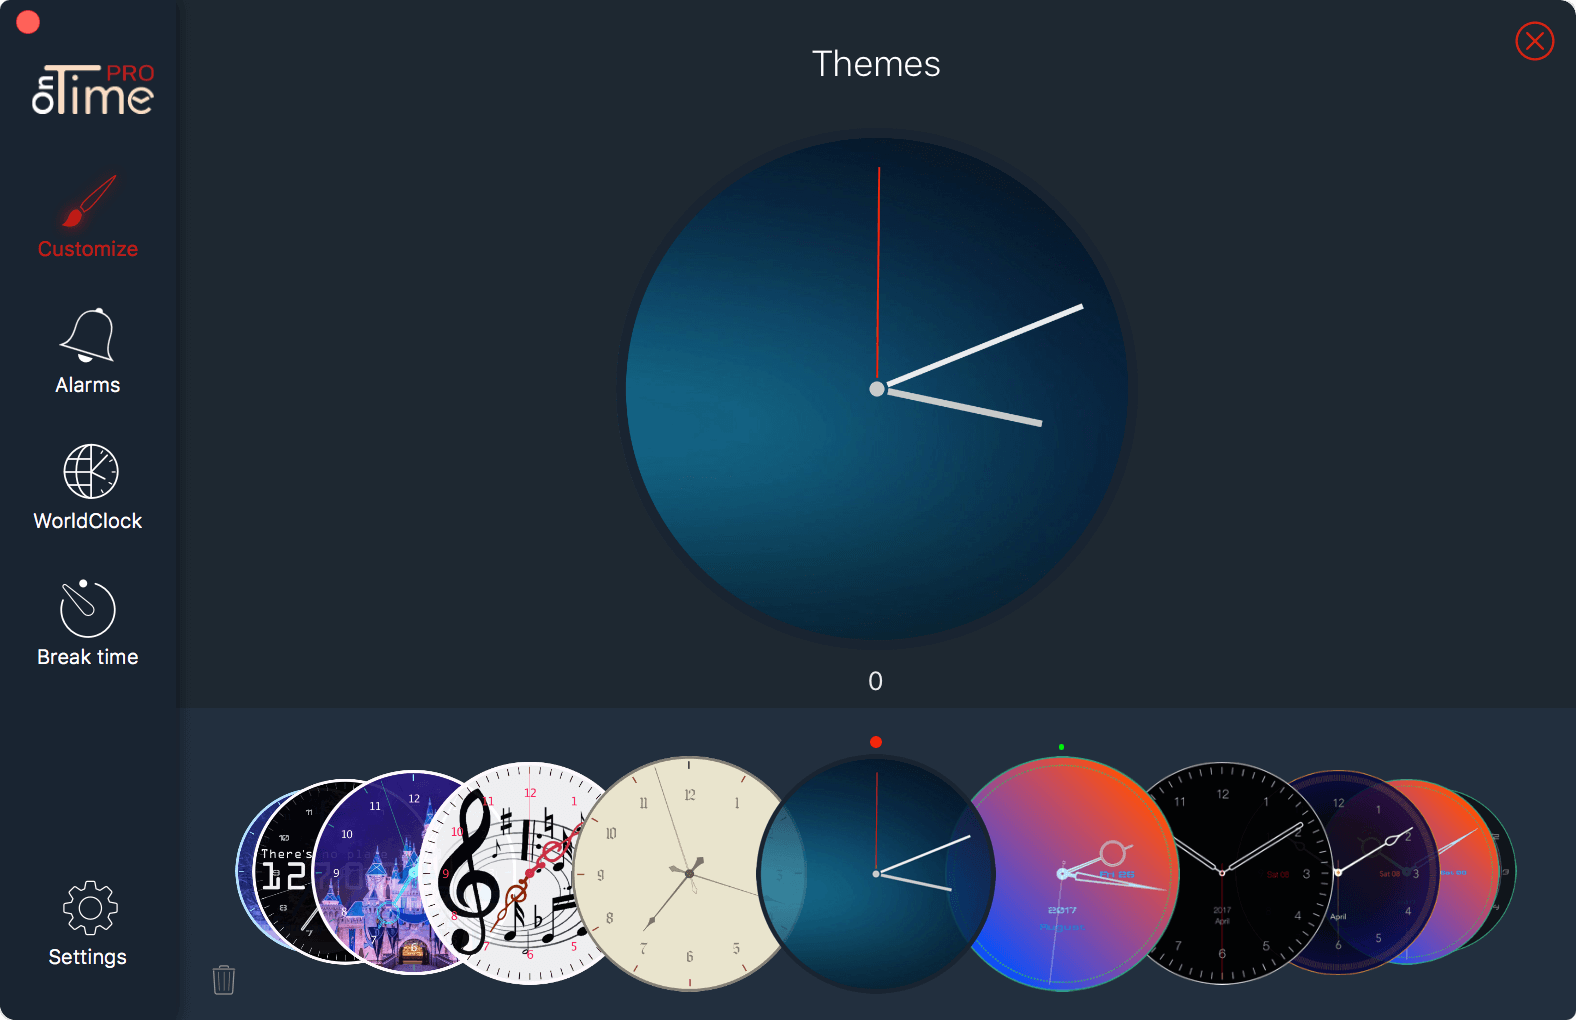
You can use your arrow keys to navigate throuh saved themes or click and drag to move to another theme. Themes with a green dot above are saved by you, and can be deleted anytime. The only theme with a red dot above is the current theme of the clock, so if you surf trouht themes, you can always spot and come back to initial theme. Default themes dont't have any dot above an canot be deleted.
Customize Digital
To make a change, firstly you must select the element you want to modify. Move the cursor over the model and click on an element to select it.

Here is the available parts to select for Digital clock:
Border:
- Color - Change the color of the border line
- Radius - Change the corner radius of the clock.
- Width - Change the border width
Alarms
- Show - Show or hide the bell icon from clock
- Color - Change bell color Note: The bell will be visible only if at least one alarm is enabled.
Date:
- Color - Change the color of the border line
- Weekend - Change the color weekend days
- Font - Select your favourite font to display the date
- Day - Show or hide day
- Month - Show or hide month
Time:
- Color - Change the color of the border line
- Font - Select desired for display time
- Short time - Show or hide seconds
Background and size
- Enabled - Show or hide clock background
- Type - Choose your favourite background style:
- Color - The background will be filled with a solid color
- Gradient - You can choose 2 colors to create a custom gradient
- Image - Choose any image from your computer, edit and crop it
- Opacity - Choose the opacity level for OnTime background
- Clock size - Change the size of the clock.You can also change the size by using a pinch gesture on the clock.
Save a theme
After you have modified the clock in the way that you wanted, you can save the current theme of the clock for later use by pressing Save theme button. Choose a name for your theme and click on save button.
Load a saved theme
Click on Saved themes to see all saved themes and apply one.
You can use your arrow keys to navigate throuh saved themes or click and drag to move to another theme. Themes with a green dot above are saved by you, and can be deleted anytime. The only theme with a red dot above is the current theme of the clock, so if you surf trouht themes, you can always spot and come back to initial theme. Default themes dont't have any dot above an canot be deleted.
Customize Fantasy Dynamic
To make a change, firstly you must select the element you want to modify. Move the cursor over the model and click on an element to select it.

Here is the available parts to select for Fantasy dynamic clock:
Border:
- Color - Change the color of the border line
- Width - Change the border width
Date:
- Color - Change the color of the border line
Alarms
- Show - Show or hide the bell icon from clock
- Color - Change bell color Note: The bell will be visible only if at least one alarm is enabled.
Seconds:
- Hand - Change seconds hand color
- Circle - Change the color of selected circle
Minutes:
- Hand - Change minutes hand color
- Circles - Change the color of selected circles
- Ticks - Change the color of selected ticks
- Numbers - Change the color of selected numbers
- Animate - Enable or disable animation for minutes
- Animation - Set color for animation, if is enabled
- Image - Enable or disable using image as background
- Opacity - If an image is selected you can alterate the opacity
- Select image - Open the image editor to choose a custom image from your computer
Hours:
- Hand - Change hours hand color
- Circles - Change the color of selected circles
- Numbers - Change the color of selected numbers
- Animate - Enable or disable animation for hours
- Animation - Set color for animation if is ennabled
- Image - Enable or disable using image as background
- Opacity - If an image is selected you can alterate the opacity
- Select image - Open the image editor to choose a custom image from your computer
Week days:
- Hand - Change week days hand color
- Circles - Change the color of selected circles
- Ticks - Change the color of selected ticks
- Image - Enable or disable using image as background
- Opacity - If an image is selected you can alterate the opacity
- Select image - Open the image editor to choose a custom image from your computer
Background and size
- Enabled - Show or hide clock background
- Type - Choose your favourite background style:
- Color - The background will be filled with a solid color
- Gradient - You can choose 2 colors to create a custom gradient
- Image - Choose any image from your computer, edit and crop it
- Opacity - Choose the opacity level for OnTime background
- Clock size - Change the size of the clock.You can also change the size by using a pinch gesture on the clock.
Save a theme
After you have modified the clock in the way that you wanted, you can save the current theme of the clock for later use by pressing Save theme button. Choose a name for your theme and click on save button.
Load a saved theme
Click on Saved themes to see all saved themes and apply one.
You can use your arrow keys to navigate throuh saved themes or click and drag to move to another theme. Themes with a green dot above are saved by you, and can be deleted anytime. The only theme with a red dot above is the current theme of the clock, so if you surf trouht themes, you can always spot and come back to initial theme. Default themes dont't have any dot above an canot be deleted.
Customize Fantasy
To make a change, firstly you must select the element you want to modify. Move the cursor over the model and click on an element to select it.
Here is the available parts to select for Fantasy clock:
Border:
- Color - Change the color of the border line
- Width - Change the border width
Date:
- Color - Change the color of the border line
Alarms
- Show - Show or hide the bell icon from clock
- Color - Change bell color Note: The bell will be visible only if at least one alarm is enabled.
Seconds:
- Hand - Change seconds hand color
- Circle - Change the color of selected circle
Minutes:
- Hand - Change minutes hand color
- Circles - Change the color of selected circles
- Ticks - Change the color of selected ticks
- Numbers - Change the color of selected numbers
- Animate - Enable or disable animation for minutes
- Animation - Set color for animation, if is enabled
- Image - Enable or disable using image as background
- Opacity - If an image is selected you can alterate the opacity
- Select image - Open the image editor to choose a custom image from your computer
Hours:
- Hand - Change hours hand color
- Circles - Change the color of selected circles
- Numbers - Change the color of selected numbers
- Animate - Enable or disable animation for hours
- Animation - Set color for animation if is ennabled
- Image - Enable or disable using image as background
- Opacity - If an image is selected you can alterate the opacity
- Select image - Open the image editor to choose a custom image from your computer
Week days:
- Hand - Change week days hand color
- Circles - Change the color of selected circles
- Ticks - Change the color of selected ticks
Image
- Enable or disable using image as background- Opacity - If an image is selected you can alterate the opacity
- Select image - Open the image editor to choose a custom image from your computer
Background and size
- Enabled - Show or hide clock background
- Type - Choose your favourite background style:
- Color - The background will be filled with a solid color
- Gradient - You can choose 2 colors to create a custom gradient
- Image - Choose any image from your computer, edit and crop it
- Opacity - Choose the opacity level for OnTime background
- Clock size - Change the size of the clock.You can also change the size by using a pinch gesture on the clock.
Save a theme
After you have modified the clock in the way that you wanted, you can save the current theme of the clock for later use by pressing Save theme button. Choose a name for your theme and click on save button.
Load a saved theme
Click on Saved themes to see all saved themes and apply one.

You can use your arrow keys to navigate throuh saved themes or click and drag to move to another theme. Themes with a green dot above are saved by you, and can be deleted anytime. The only theme with a red dot above is the current theme of the clock, so if you surf trouht themes, you can always spot and come back to initial theme. Default themes dont't have any dot above an canot be deleted.
Customize Hybrid
To make a change, firstly you must select the element you want to modify. Move the cursor over the model and click on an element to select it.
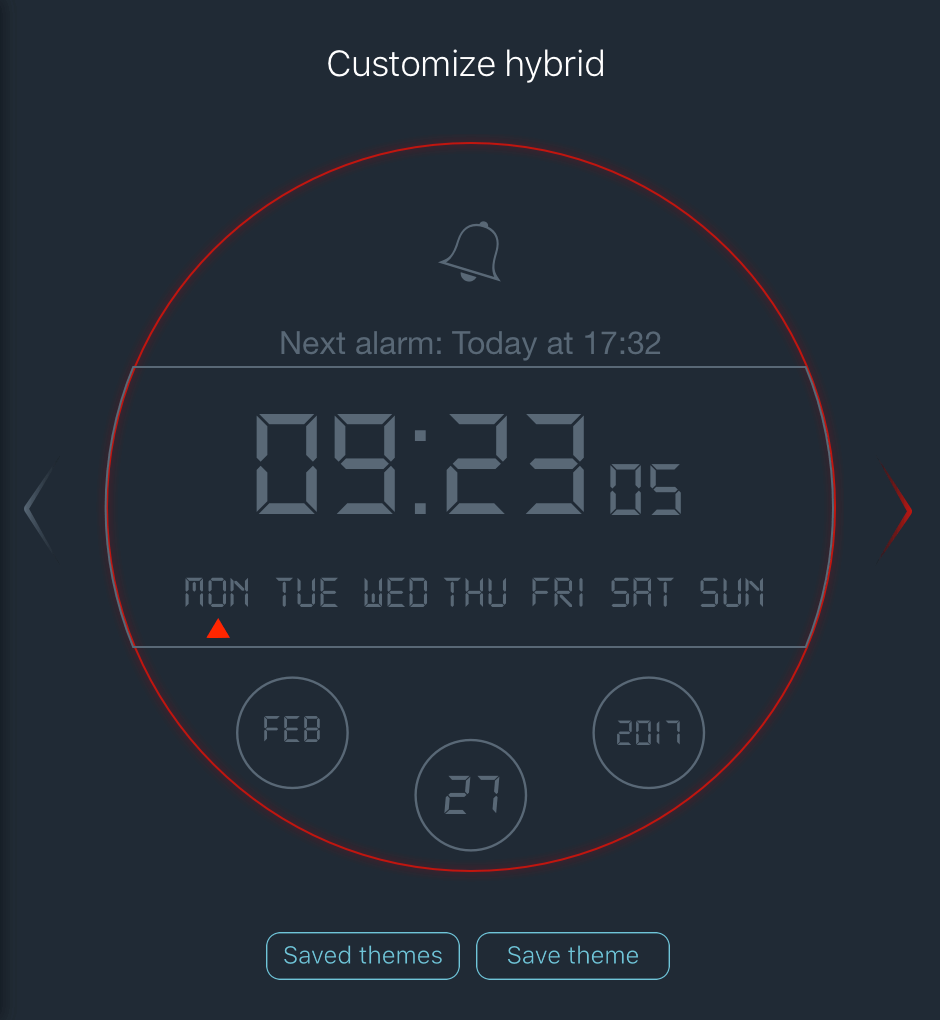
Here is the available parts to select for Hybrid clock:
Border:
- Color - Change the color of the border line
- Width - Change the border width
Alarm info:
If you have active alarms, Hybrid clock will display info about next running alarm.
- Color - Change the color of alarm info string
- Font - S Select your favourite font to display the alarm info
Time:
- Time - Change time color
- Font - Select your favourite font to display the time
- Short time - Show or hide seconds
- Days - Select the color used to dispaly days
- Weekend - Select the color used to dispay weekdays
- Arrow - Choose the arrow color that indicates the current day
- Background - Enable or disable usage of a solid color as background
- Color - If background is enabled, choose the solid color to fill it
Date / System info:
- Show - Choose witch kind of information to show on the
clock. You have two options available:
- Date - Display current day, month and the year
- Day - Check the box if you want the current day to be shown, and select its color
- Month - Check the box if you want the current month to be shown, and select its color
- Year - Check the box if you want the current year to be shown, and select its color
- Font - Select your favourite font to display the date
- System info - Display live information about your
Ram, CPU and Disk usage.
- Ram
- Background - Choose the color for Ram background
- Color - Choose the color for Ram usage
- Text - Choose the color for percent text usage
- Info text - Choose the color used to display the text below the percentage
- CPU
- Background - Choose the color for CPU background
- Color - Choose the color for CPU usage
- Text - Choose the color for percent text usage
- Info text - Choose the color used to display the text below the percentage
- Disk
- Background - Choose the color for Disk background
- Color - Choose the color for Disk usage
- Text - Choose the color for percent text usage
- Info text - Choose the color used to display the text below the percentage
- Ram
- Date - Display current day, month and the year
Week days:
- Hand - Change week days hand color
- Circles - Change the color of selected circles
- Ticks - Change the color of selected ticks
- Image - Enable or disable using of image as background
- Opacity - If an image is selected you can alterate the opacity
- Select image - Open the image editor to choose a custom image from your computer
Background and size
- Enabled - Show or hide clock background
- Type - Choose your favourite background style:
- Color - The background will be filled with a solid color
- Gradient - You can choose 2 colors to create a custom gradient
- Image - Choose any image from your computer, edit and crop it
- Opacity - Choose the opacity level for OnTime background
- Clock size - Change the size of the clock.You can also change the size by using a pinch gesture on the clock.
Save a theme
After you have modified the clock in the way that you wanted, you can save the current theme of the clock for later use by pressing Save theme button. Choose a name for your theme and click on save button.
Load a saved theme
Click on Saved themes to see all saved themes and apply one.
You can use your arrow keys to navigate throuh saved themes or click and drag to move to another theme. Themes with a green dot above are saved by you, and can be deleted anytime. The only theme with a red dot above is the current theme of the clock, so if you surf trouht themes, you can always spot and come back to initial theme. Default themes dont't have any dot above an canot be deleted.
Customize Bent
To make a change, firstly you must select the element you want to modify. Move the cursor over the model and click on an element to select it.

Here is the available parts to select for Bent clock:
Border:
- Color - Change the color of the border line
- Width - Change the border width
Ticks and numbers
- Show - Show or hide tiks
- Color - Change ticks color
- Style - Choose between Lines and Dots ticks style
- Show - Show or hide numbers
- Color - Change numbers color
Date
- Day - Check the box if you want the current day to be shown, and select its color
- Month - Check the box if you want the current month to be shown, and select its color
- Year - Check the box if you want the current year to be shown, and select its color
- Font - Select your favourite font to display the date
Alarms
- Show - Show or hide the bell icon from clock
- Color - Change bell color Note: The bell will be visible only if at least one alarm is enabled.
Hours and minutes:
- Show - Show or hide hours and minutes hand
- Color - Choose a color for hours and minutes hand
- Width - Choose thickness for hours and minutes hand
Seconds
- Show - Show or hide seconds hand
- Color - Choose a color for seconds hand
- Width - Choose thickness for seconds hand
Background and size
- Enabled - Show or hide clock background
- Type - Choose your favourite background style:
- Color - The background will be filled with a solid color
- Gradient - You can choose 2 colors to create a custom gradient
- Image - Choose any image from your computer, edit and crop it
- Opacity - Choose the opacity level for OnTime background
- Clock size - Change the size of the clock.You can also change the size by using a pinch gesture on the clock.
Save a theme
After you have modified the clock in the way that you wanted, you can save the current theme of the clock for later use by pressing Save theme button. Choose a name for your theme and click on save button.
Load a saved theme
Click on Saved themes to see all saved themes and apply one.
You can use your arrow keys to navigate throuh saved themes or click and drag to move to another theme. Themes with a green dot above are saved by you, and can be deleted anytime. The only theme with a red dot above is the current theme of the clock, so if you surf trouht themes, you can always spot and come back to initial theme. Default themes dont't have any dot above an canot be deleted.
Alarms
OnTime offers you the posibility of adding highly customizable alarms.. The main table will show you all added alarms.
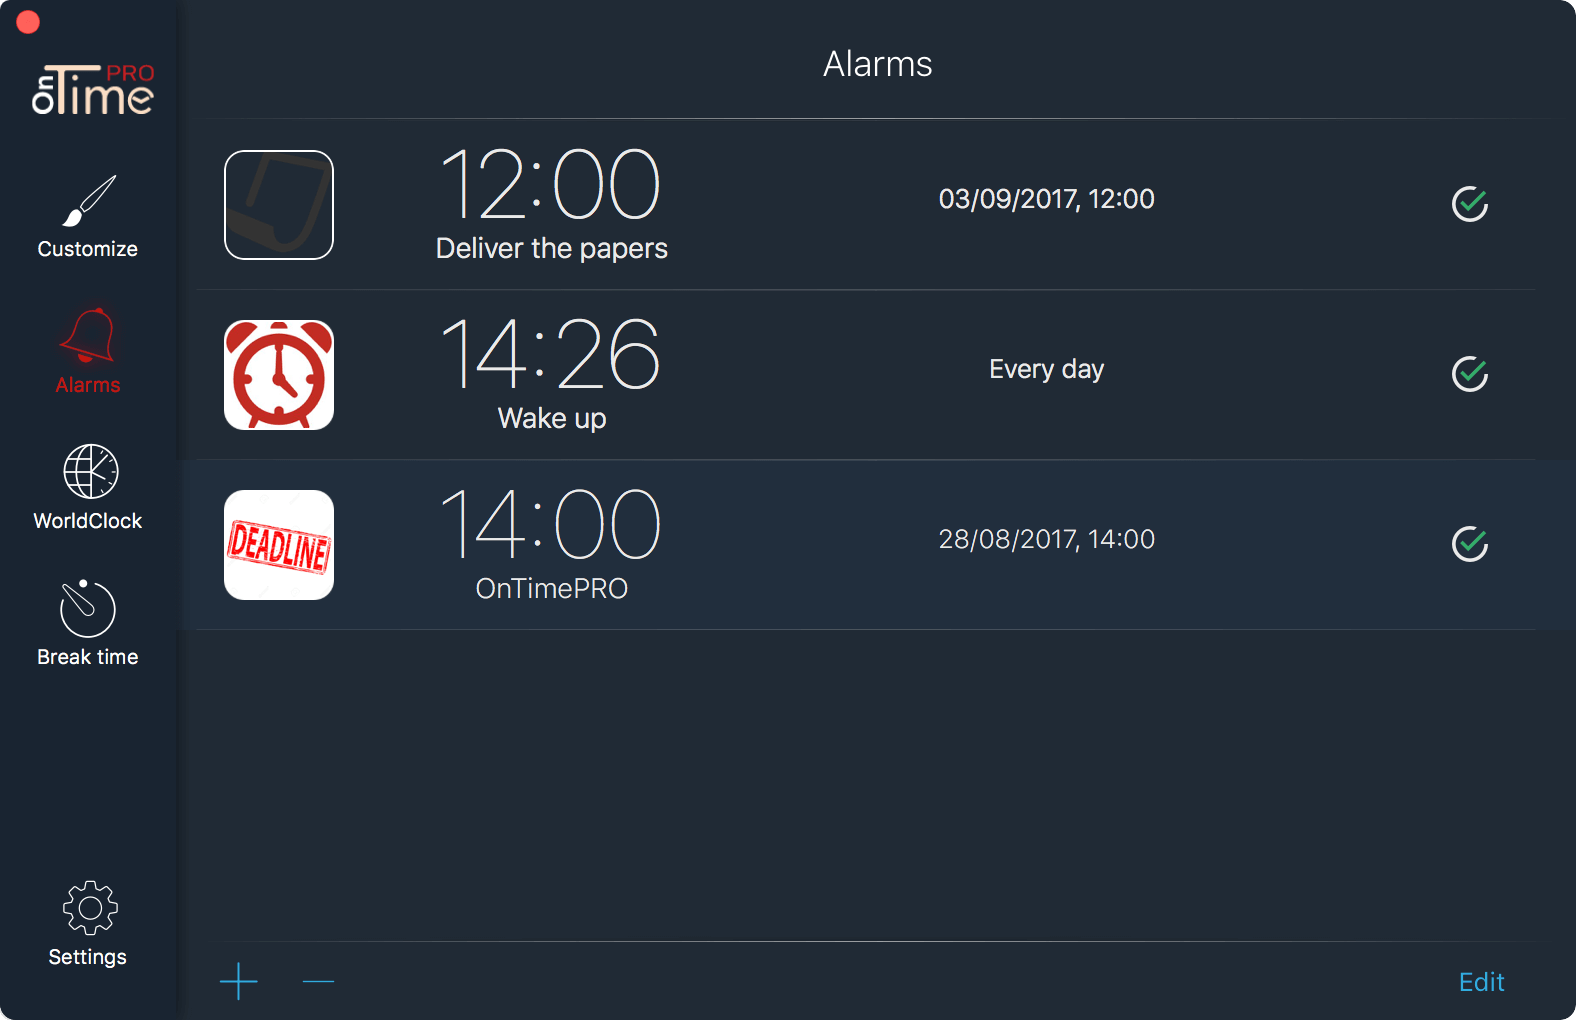
Here you can easily activate/deactivate an alarm, edit or remove it if you don't need it anymore.
Add an alarm
To add a new alarm, go to Alarms from preferences, and click on the + button from the bottom left corner. This will open a new window where you can configure your alarm in a step by step guide.
Step 1
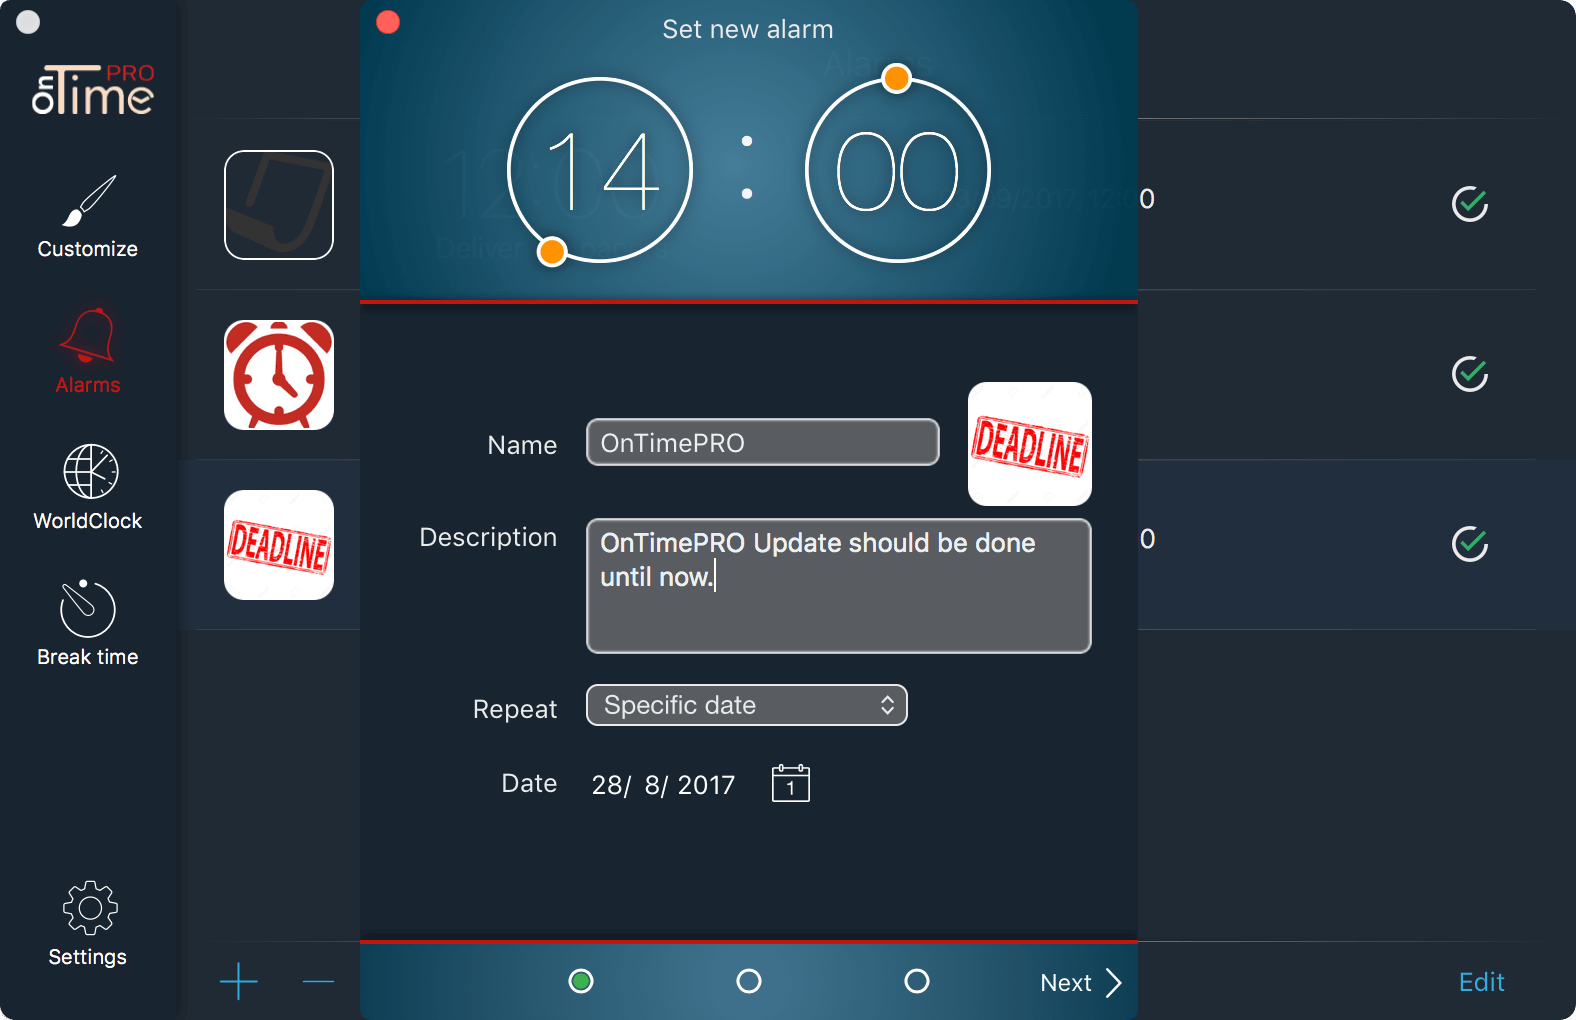
- Use the controls from the top se set the time of the alarm
- Name - Enter a name for the alarm or leave it empty
- Description - You can add some info about the alarm or leave it empty
- Repeat - Choose a repeat style for the alarm
- One time - Dependening on the time you set it up, alarm will ring today, or tomorow. After the alarm rings out, it will automatically turn off
- Daily - Alarm will ring every day at specified time
- Weekly - Alarm will ring weekly on specified days
- Monthly - Alarm will run on a specified day every month
- Specific date - Set a specific date for the alarm. After the alarm rings out, it will automatically turn off
Step 2
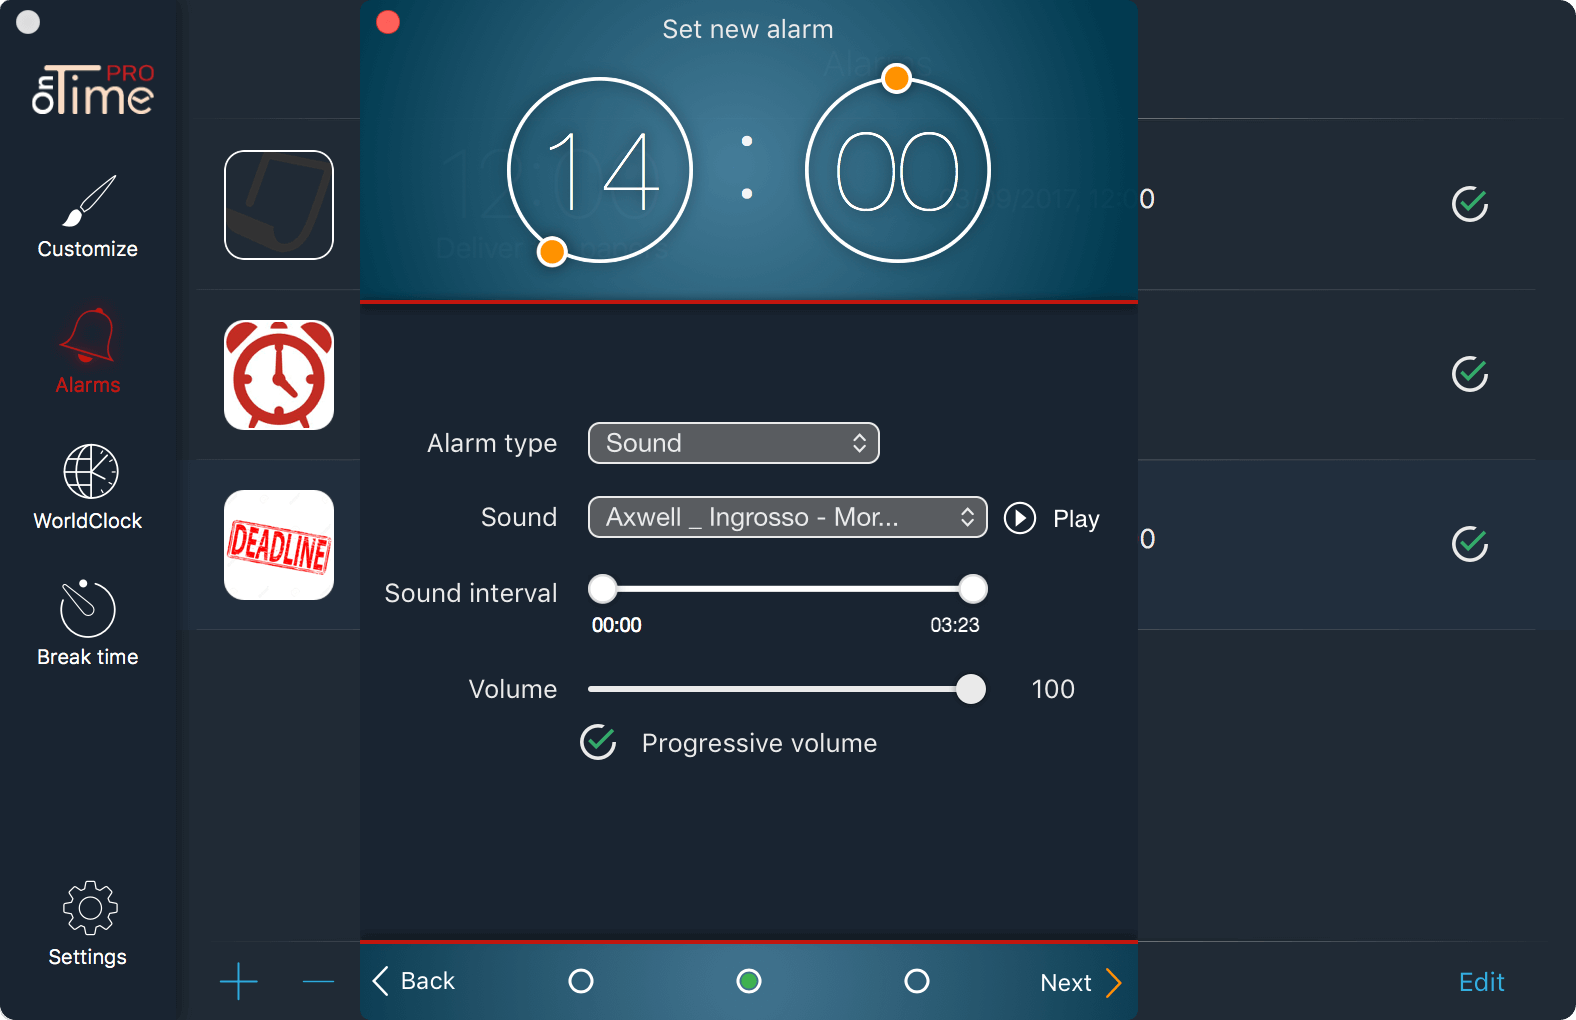
Choose between availabletypes of alarm sounds.
Sound
- Sound - When the alarm sounds you will hear the ringtone you have chosen. You have a few default ringtones, but you can add your own from your computer. For that chooseCustom as sound and that will open a window where you can choose a custom sound.
- Volume - Choose the volume of your alarm. Note: This volume will not override the volume of your sistem. To be sure that you will hear the alarm, leave your system volume above 50%.
- Progressive volume - You will hear the sound of the alarm with a progressive intro
Voice
- Voice message - When the alarm sounds the computer will spoke for you the message that you entered.
- Volume - Choose the volume of your alarm. Note: This volume will not override the volume of your sistem. To be sure that you will hear the alarm, leave your system volume above 50%.
- Progressive volume - If is checked, alarm will start playing with a fade efect: Begin with low volume, and progressive, will grow until max selected volume.
Sound and Voice
When the alarm sounds, you will hear alternatively the seleted sound and your enetered voice message.
Step 3
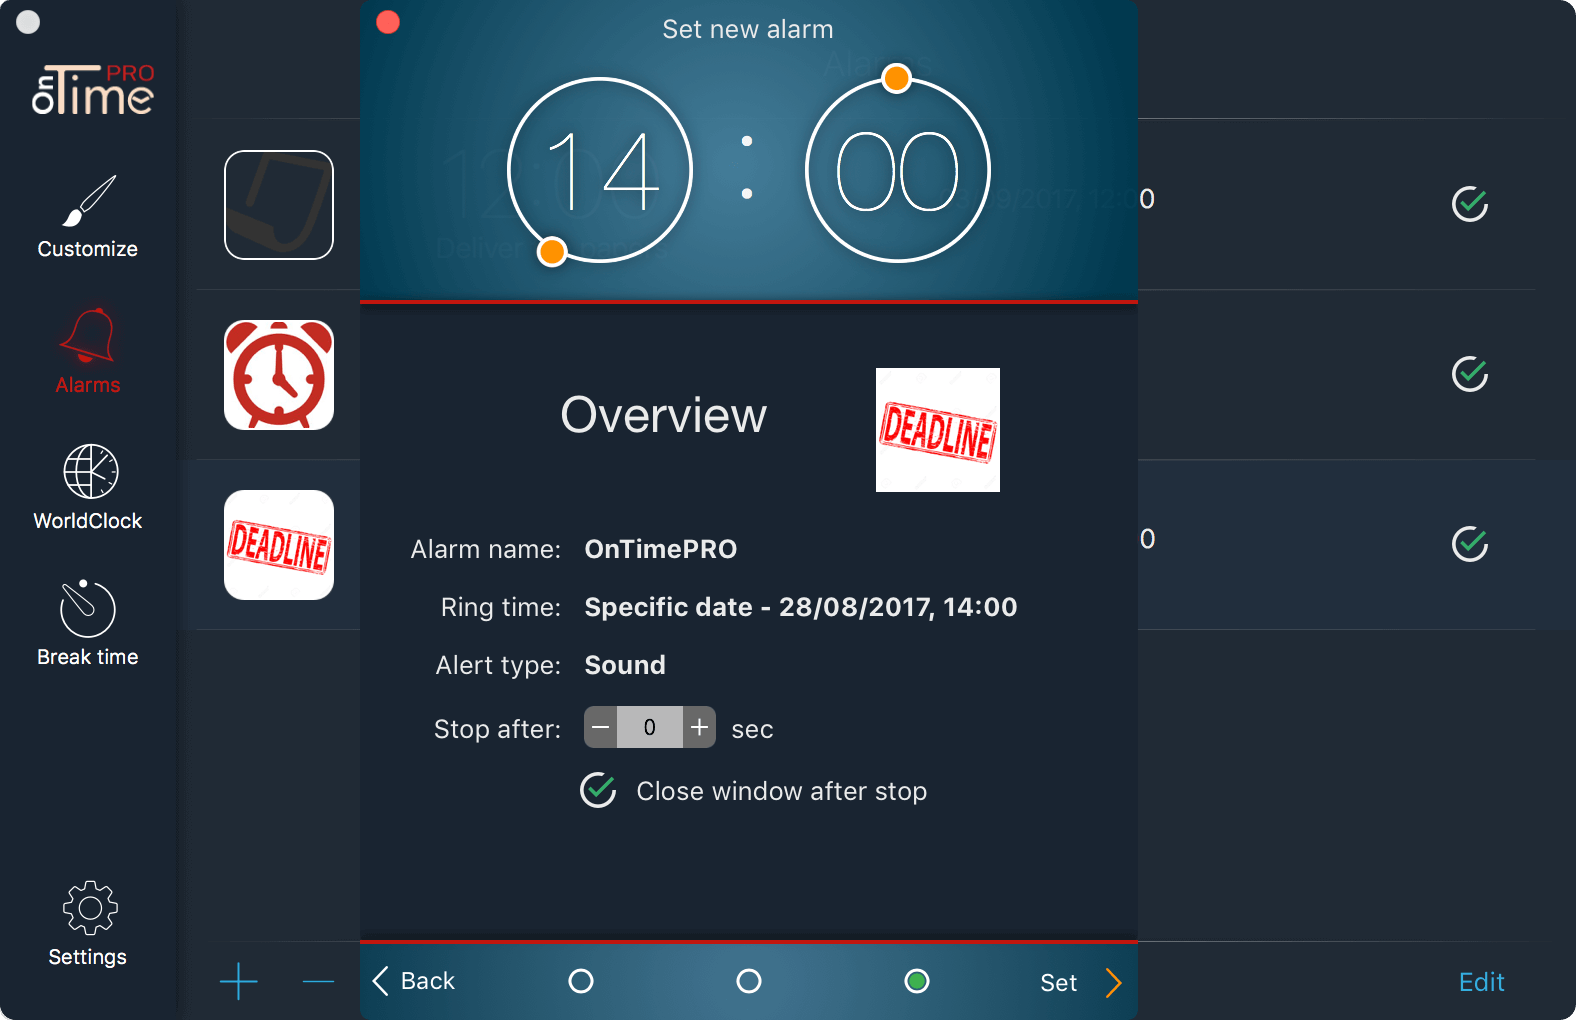
Here you have an overview of your alarm's settings. If everything is fine, you can click on the Set button to add new alarm, or you can click the Back button to change some settings. Also you can customize the behavior of alarms after running.
- Stop after - Choose a number of seconds to automatically stop an alarm if no one is in front of the computer when the alarm is running. Leave it 0 to disable automatically turn off
- Close window after stop - If is checked, the alarm window will automatically close after you click on the Stop button
Edit an alarm
To edit an existing alarm, go to Preferences -> Alarms and select the alarm you want to edit. Now click on Edit button from botton right corner. You can also use your trackpad with a left swipe to reveal the edit button.A window identical to the one for adding alarms will appear, but all fields will be already filled with options of current alarm. Follow the same steps as when you add an alarm and modify what you want. Finally, click the Set button to save the changes.
Use a custom sound
You can use your own sounds from your computer as ringtone for any alarms. To be able to use a custom sound you must fallow the next steps:
- Go to Preferences -> Alarms and click on + button to add a new alarm
- Complete the form and click on Next to move to step 2
- Select Sound or Sound and voice as alarm type
- As a sound, in the list of ringtones select Custom . This
will open a table with previous added sounds

- If it's first time when is opened, the table will be empty. Hit + button to open finder and select the sound that you want to add
- All added sounds will remain on this table and can be used on any future alarm
- Now, to use the desired sound, click on it to select it and click on Save button
World clock
Show current local time in worldwide cities, in all timezones UTC accounted for. Display each city with extensive info on time, date, moonphase, sunrise and sunset.
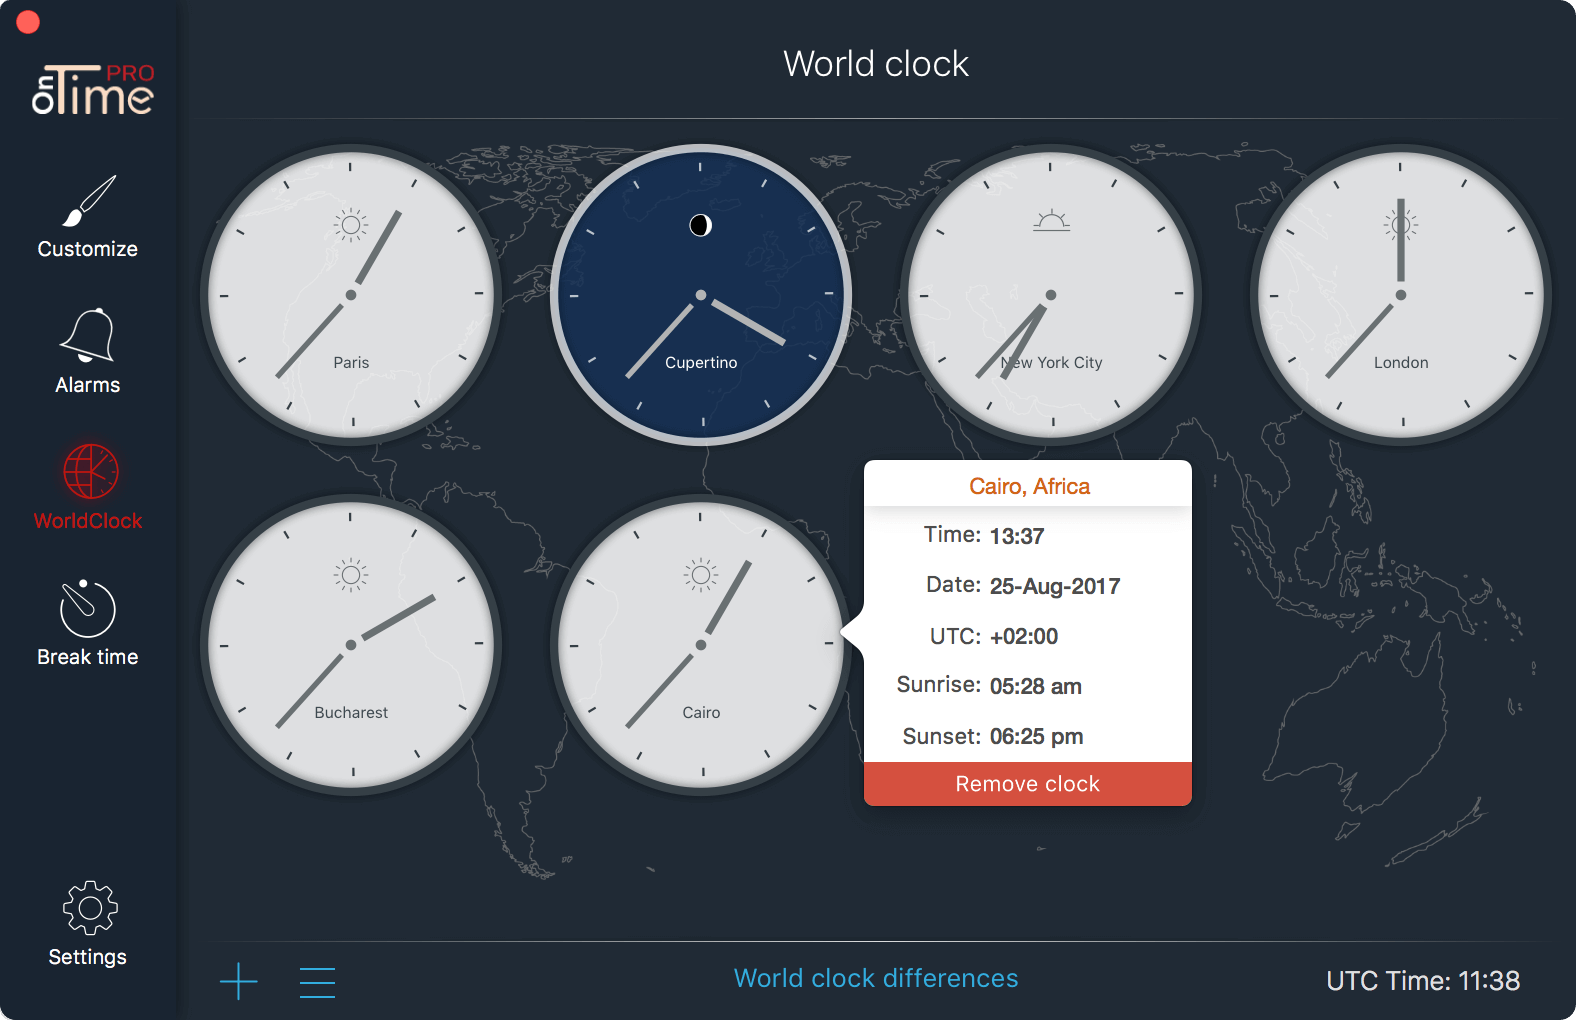
As you can see, some clocks have a dark background and others bright. This is an easier way to distinguish whether is a city is day or night time: Dark means it is night, bright means it is day. To show the popover with all informations, right click on the desired city.
World clock options
Localy, on world clock section, you have available a few settings. To see it and make some changes clickk on the options button from le bottom left corner.
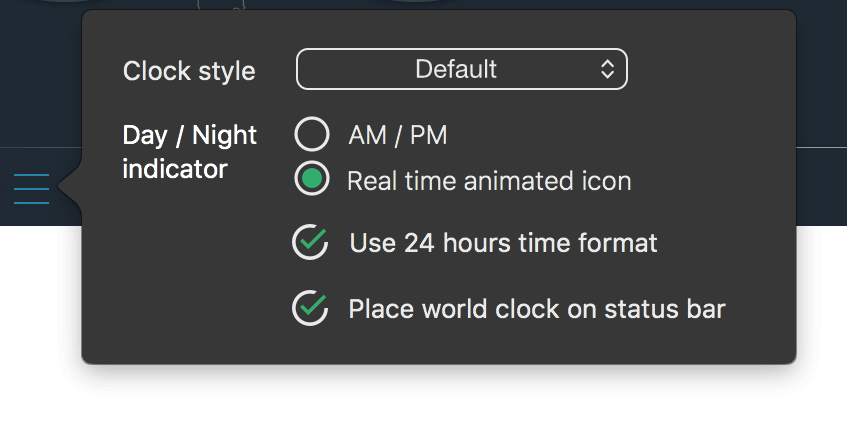
- Clock style - Select a style for displaying world clocks
- Day/Night indicator - Besides the difference depending on the background color, you can choose to display an AM/PM string or Real time animated icon. When Real time animated icon is selected you will see on the clock a small icon that will change during the day to indicate susrise, morning, day, sunset, or moon phase.
- Use 24 hours time format - Switch between or display time format. That setting will affect only time displayed in popover
- Place world clok on status bar - Add another icon on status
bar to be able to see local time for added cities without open the
preferences.

Add a world clock
To add a new world clock go to Preferences -> World Clock and click on + button.
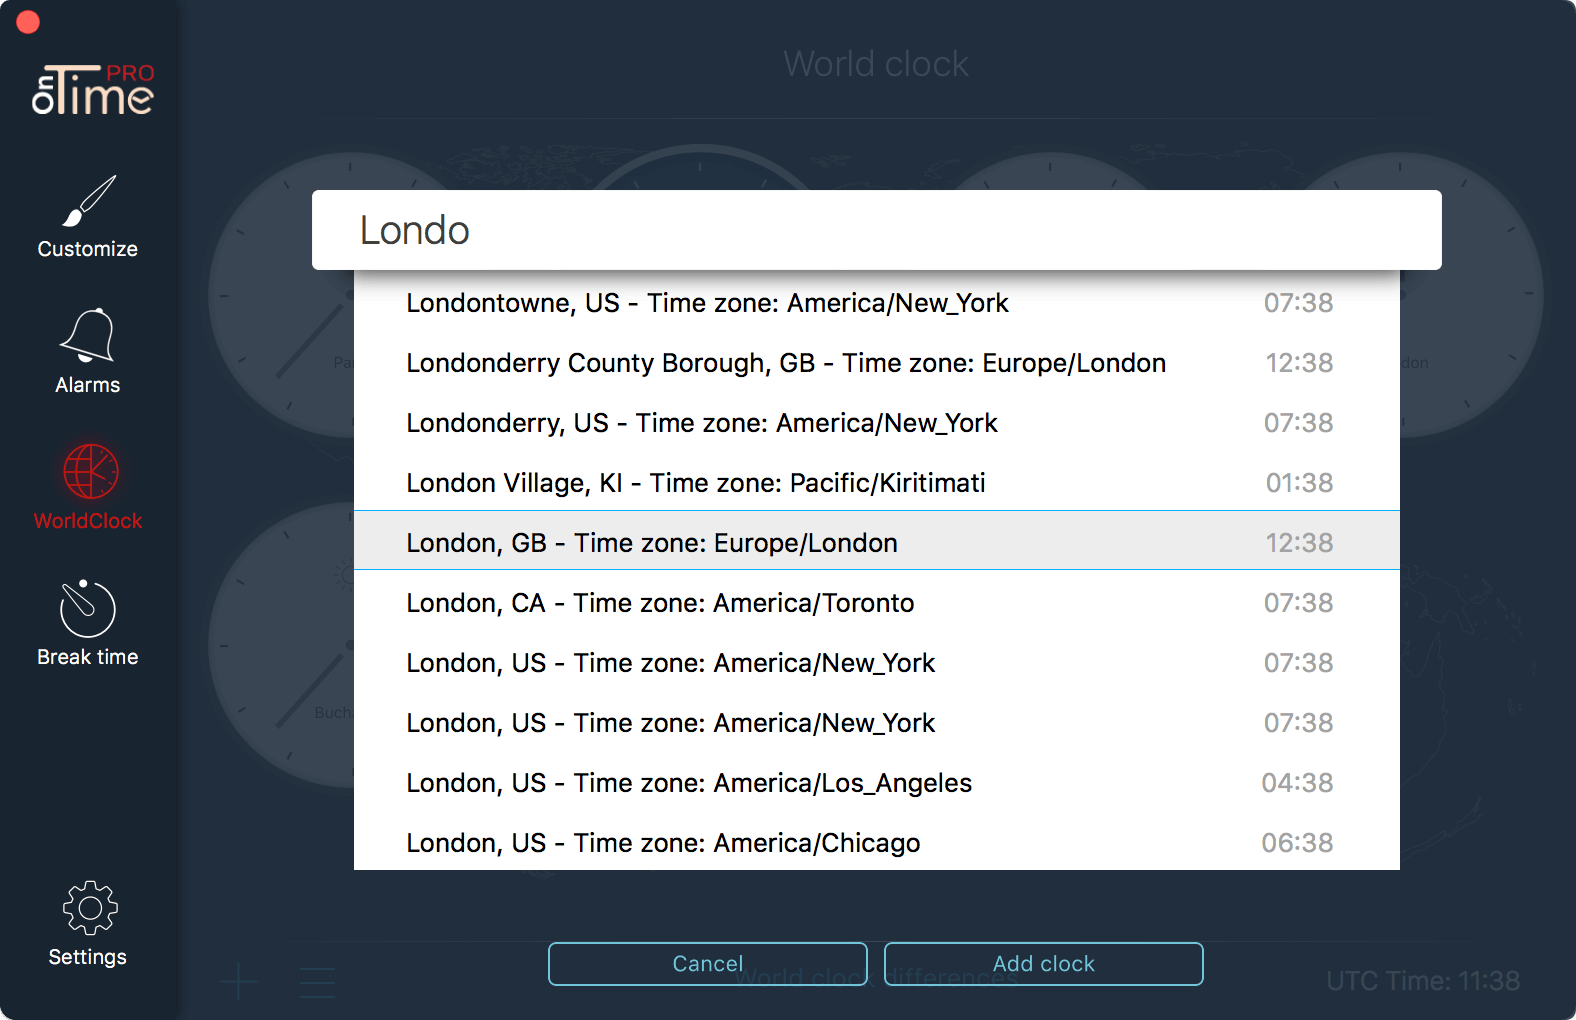
On the search box start typing the name of the city you want to add. After first 3 characters you show see a list of cities that contains entered characters. You can use your arrow keys to navigate and select the desired city, or you can click on desired city. After selection click on Add clock or press Enter to add selected clock on the main screen.
Remove a world clock
To remove a clock from the main screen, you have two options:
- Drag the clock you want to remove and drop it outside of the preference window.
- Right-click on the clock you want to remove and then click ont the Remove clock button
World clock differences
OnTime let you to see time difference from a city of your choice to locations in all time zones worldwide. How many hours later or earlier is it in places like New York, Berlin or Tokyo. Also, OnTime offers a convenient way to see the direct distance in km between two places.
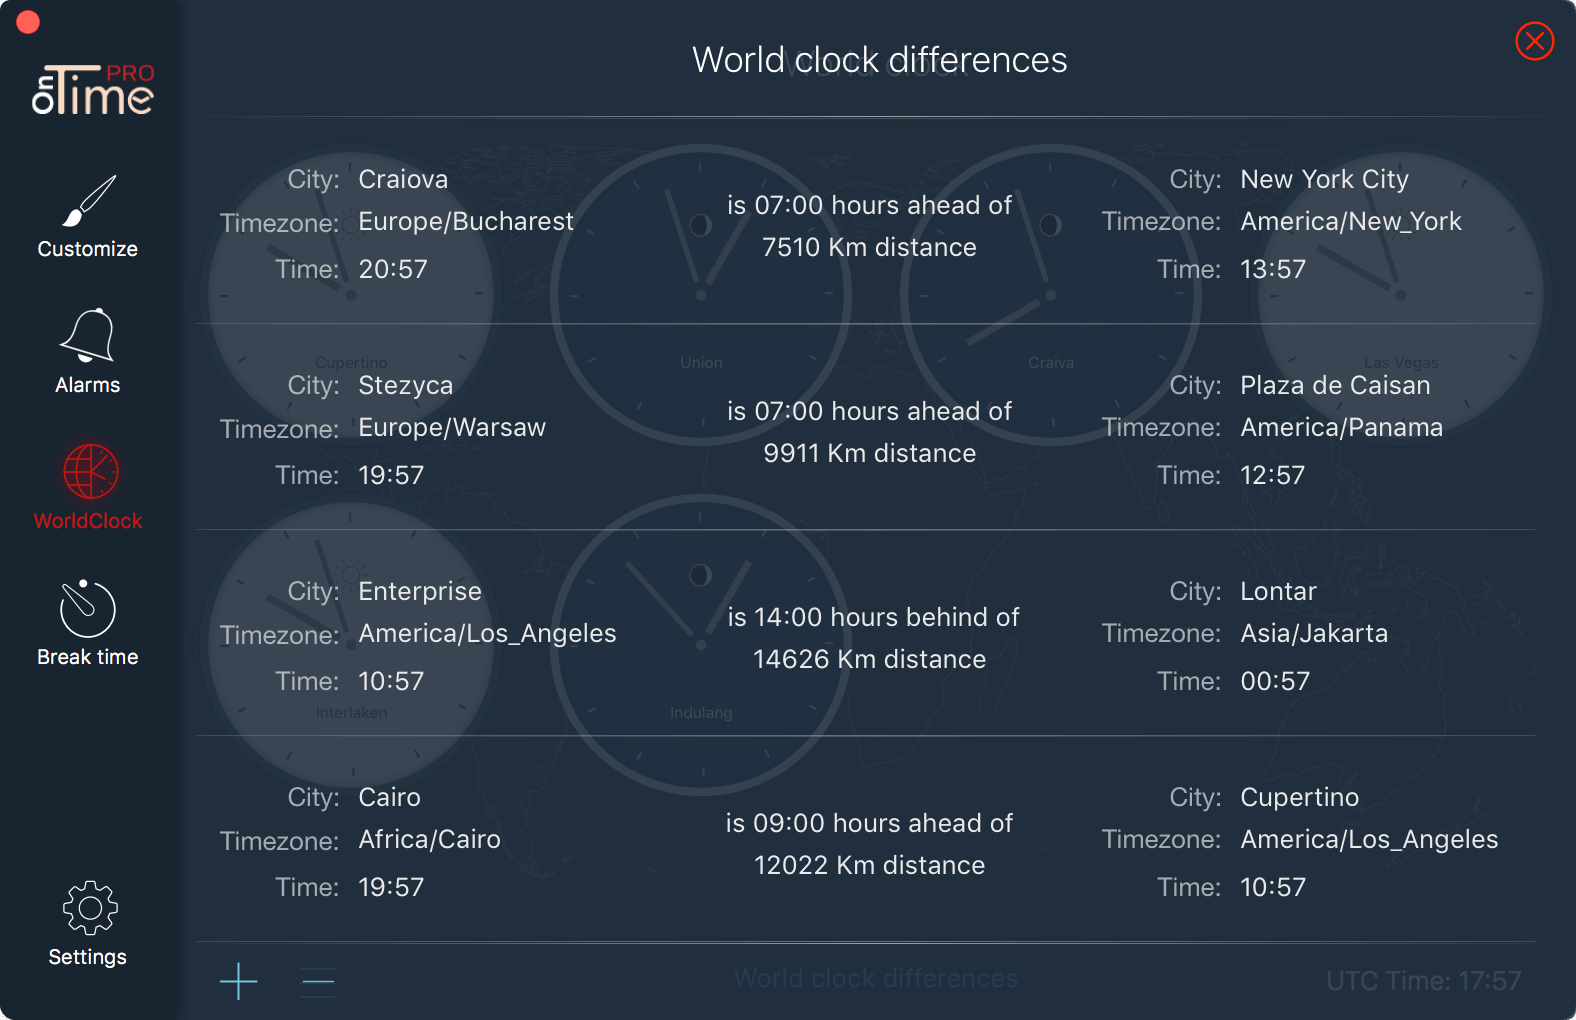
Add a world clock difference
To add a new world clock difference go to Preferences -> World Clock -> World clock differences and click on the + button. On the search box start typing the name of the city you want to add. After first 3 characters you show see a list of cities that contains entered characters. You can use your arrow keys to navigate and select the desired city, or you can click on desired city. After selection click on Next button, and repeat the search for the second city. After selecting of the second city, click on Add new difference button.
Remove a world clock difference
To remove an existing world clock difference select from the World Clock differences table the difference that you want to remove then click on the - button.
Break time
Spending hours in front of your Mac every day isn't healthy. Unfortunately for many of us, quitting the computer isn't an option. With break time enabled, you can minimize the negative impact of using your computer. Break time will remaind you to take a short break at specific amount of time, which not only will maintain your healthy, but will make you more productive. OnTime will help you to remain healthy while using computer, by remaind/force you to take a break. Because we a are so different, and we have diverse kind of work, Break time came with a large variety of settings.
General
You have available two ways to configure break time to adapt to your work style: Using Break time wizzard, which will guide you through all important features, or you can configure it in advaced mode by skipping the wizzard.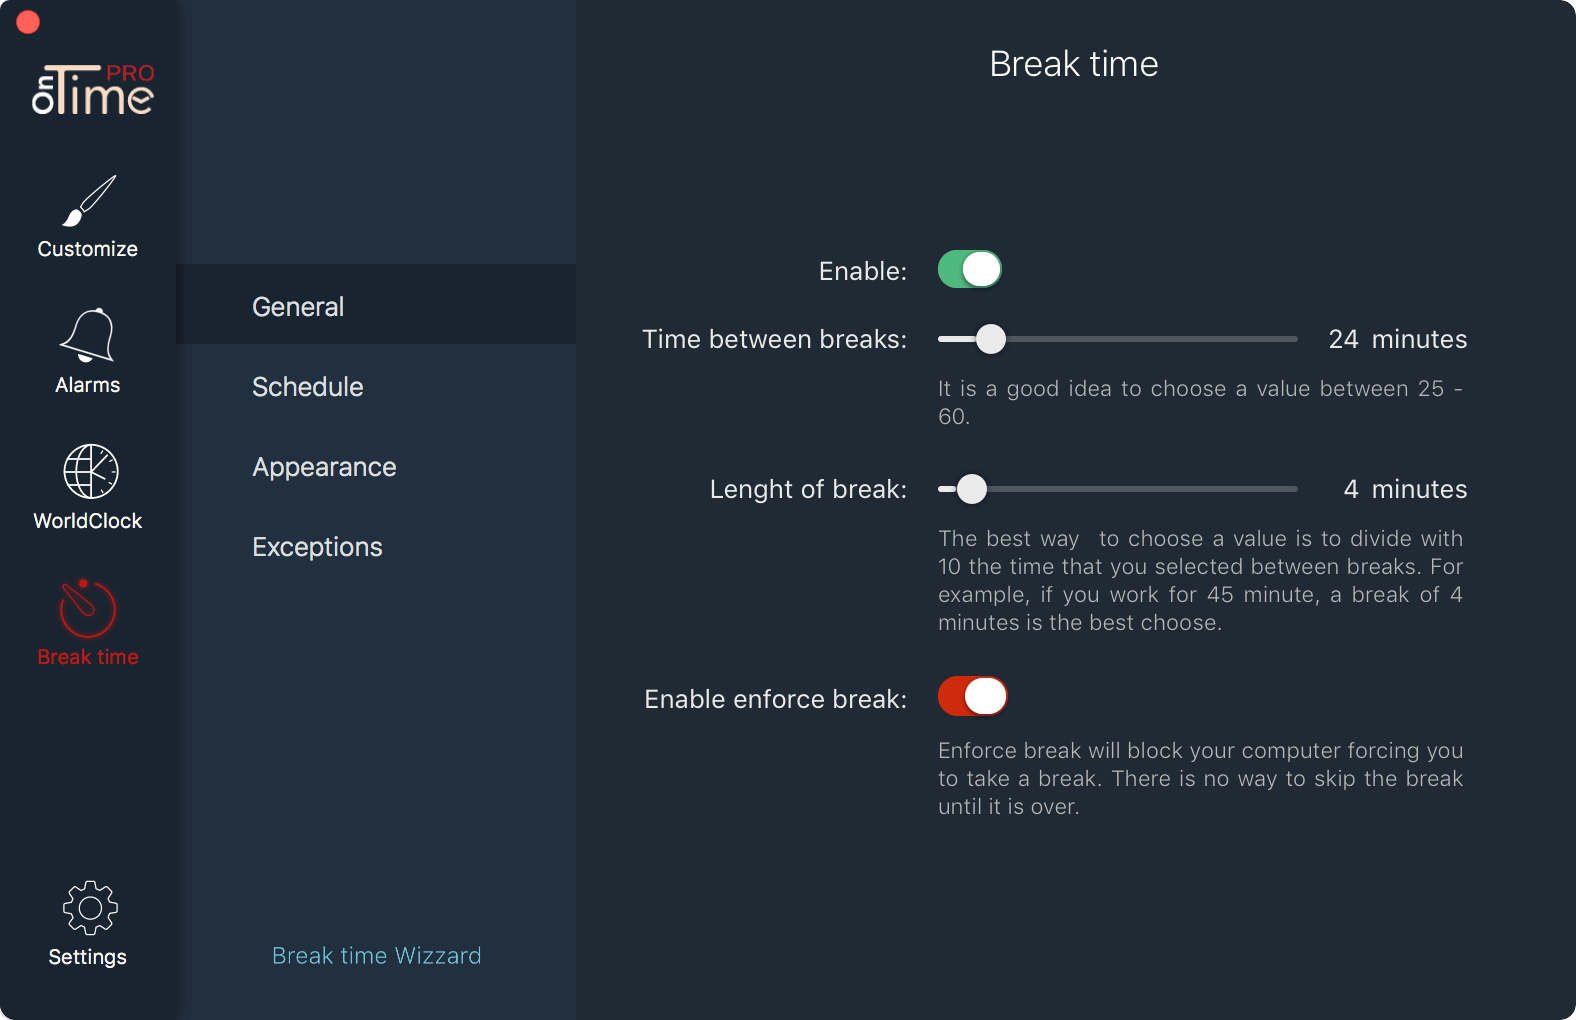
- Enable - Enable or disable break time
- Time between breaks - Choose how much time do you want to spend working
- Lenght of break - How long should be the break
- Enable enforce break - Enable or disable enforce break. When it is enabled, during the break, you canot do anything to stop the break.
Schedule
Adapts break time to your needs. Through Schedule you can set when you want to be active Break time.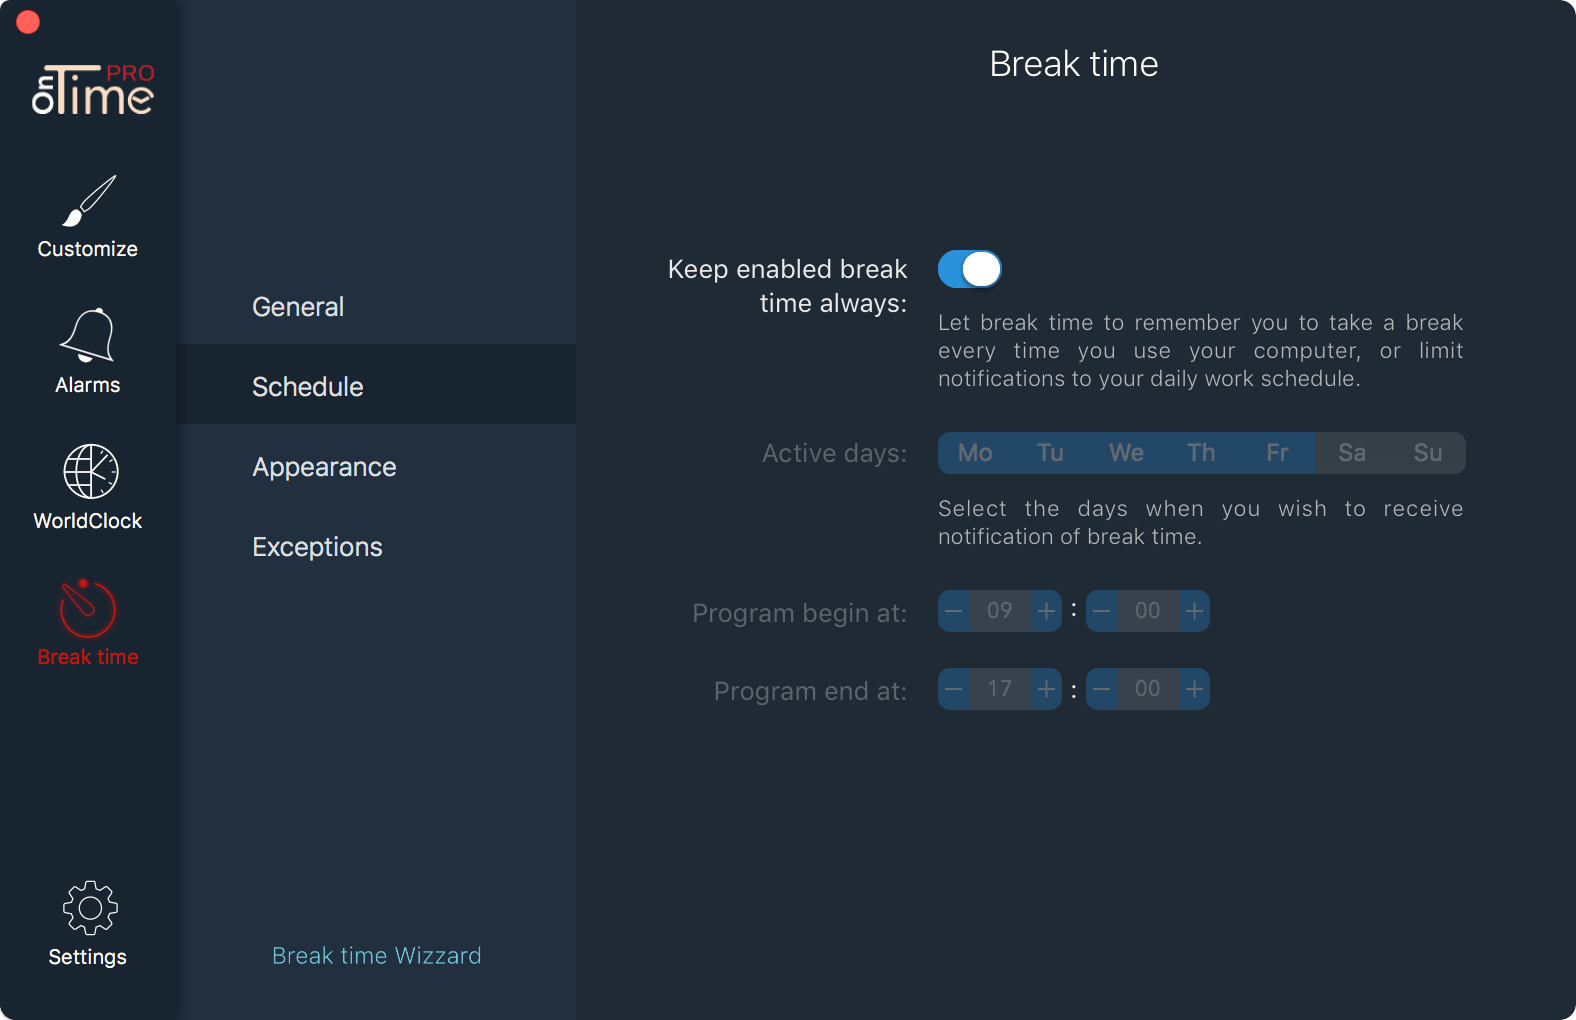
- Keep enabled break time always - When it's enabled, break time will be active all the time when you use your computer. If is disabled, you can choose the days and the time interval when you want to be active break time.
- Active days - Choose the days when you want break time to be active
- Program begin at: - Set the time you want to start break time in active days
- Program end at: - Set the time you want to stop break time in active days
Appearence
Choose how to customize the appearence during a break.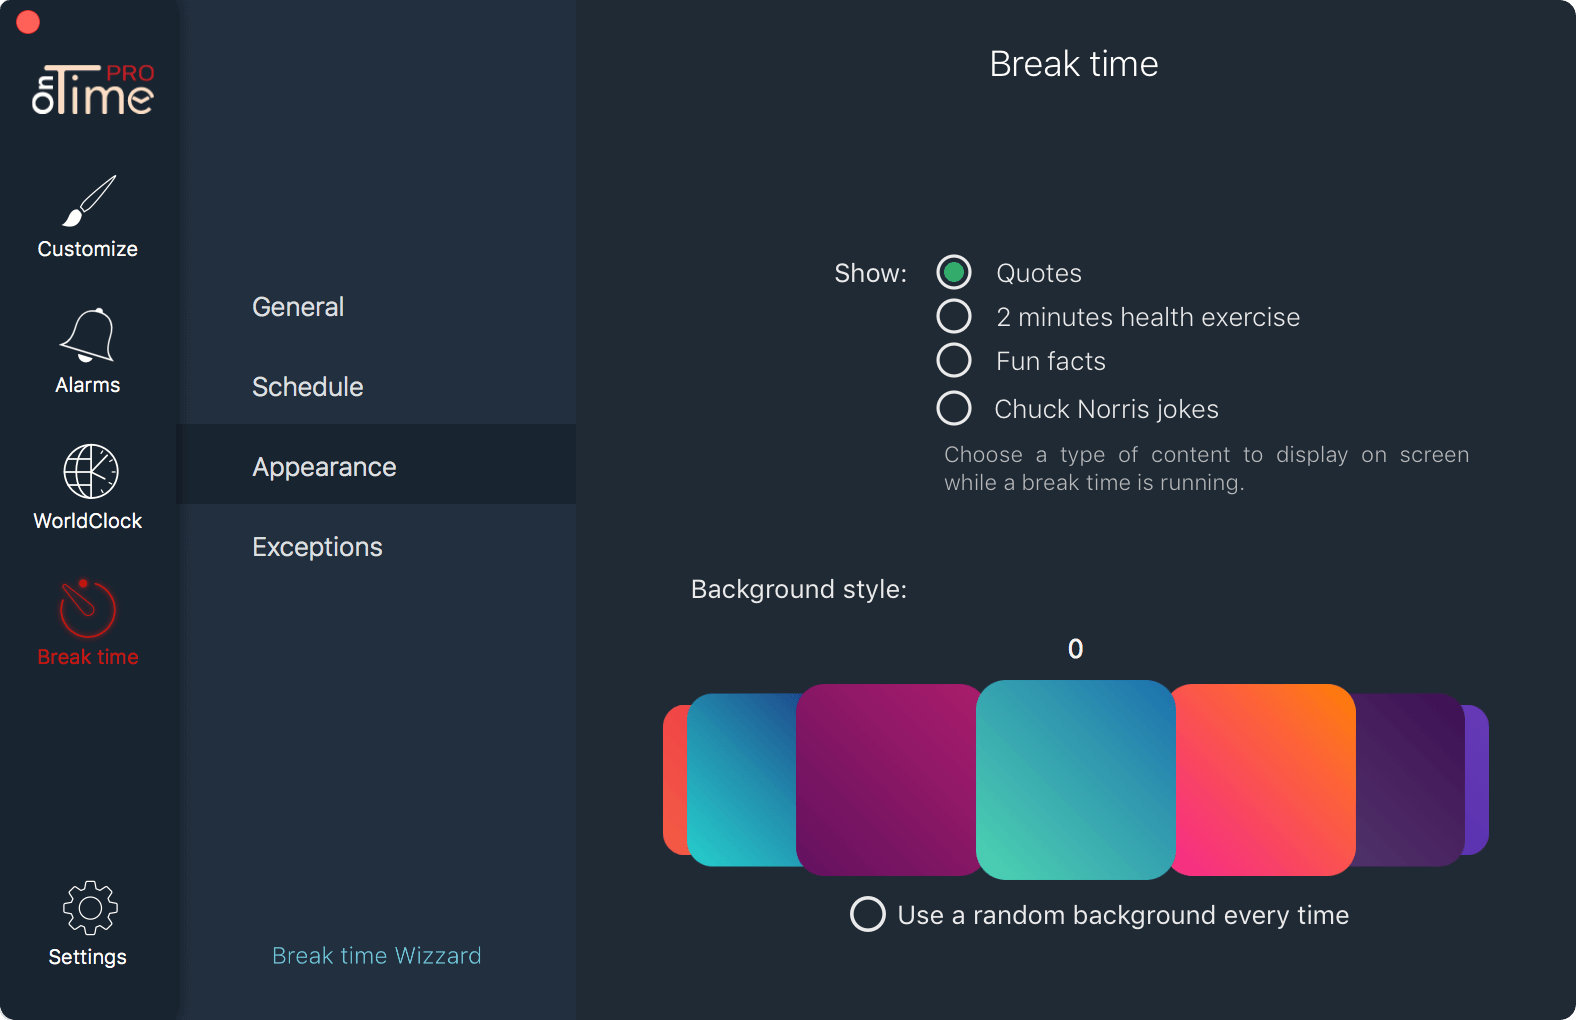
- Show - Choose what interactive info do you want to be displayed on screen during the break:
- Quotes - In every break you will see a new quote on the screen
- 2 minutes health exercise - At each break, you will see the instructions necessary to achieve a short exercise that will keep you in shape.
- Fun facts - If you are connected to the internet every break you will see a fun fact. It's an iteractive way to discover the past.
- Chuck Norris jokes- If you are connected to the internet every break you will see a joke about/with Chuck Norris!
- Background style - Choose the color schema to fill the main disply during the break
- Use a custom background every timeOverride the Background style, and for every break you will see a random style.
Exceptions
You certainly do not want to take a break when watching a movie, or talk to someone through Face time. For that kind of moments exist Exeptions. If one of applications added here is running and is active, any break time will be canceled until another app become active.
General

- Run on start up - Set OnTime to run automaticaly on startup, after user logon
- Hide dock icon - Set the visibility of OnTime icon in dock
- Black and white menu bar icon - Set the style for icons from menu bar
- Show text under the icons - Check the box to show the description under icons in preferences panel
- Display "Did you know" tips on startup - Check the box to show on startup tips or hidden features of OnTime
- Interface style - Choose between available color styles for preferences panel
Quotes
OnTime has posibility to speak to you every hour, and tell you a quote.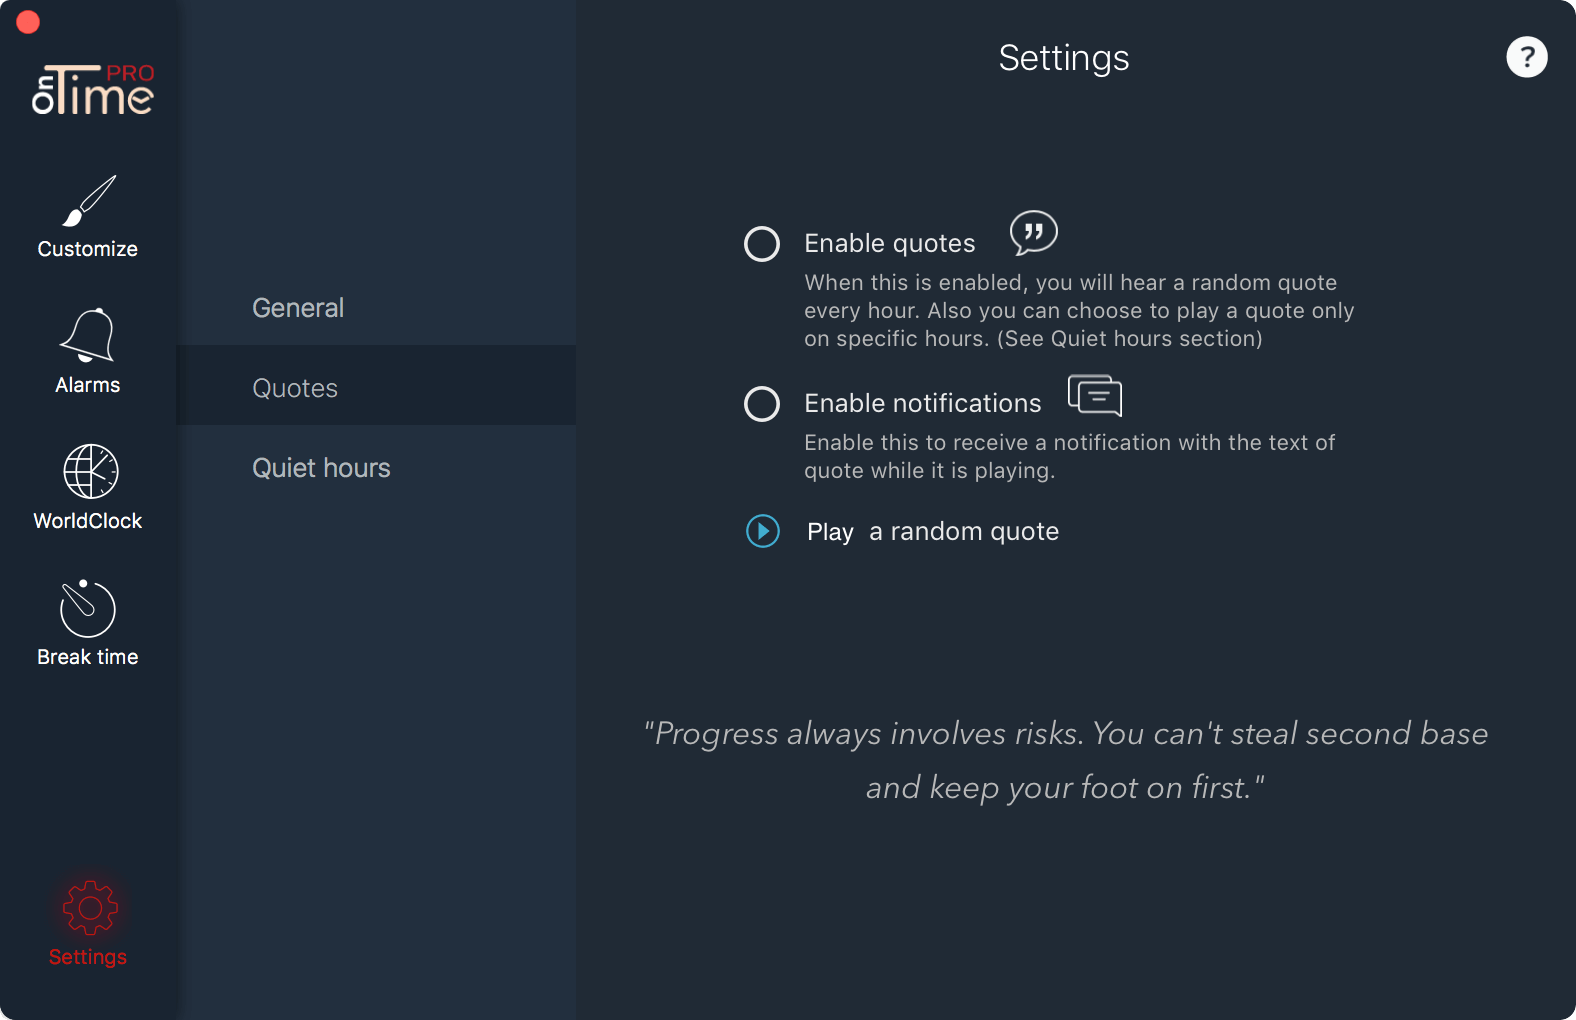
- Enable quotes - Activate or deactivate quotes
- Enable notifications - Get in notification center a text with spoked quote.
- Play random quote - Sample method to test how quotes works
Quit hours
Quiet hours allows you to choose hours when you don't want to be disturbed with a rando quote.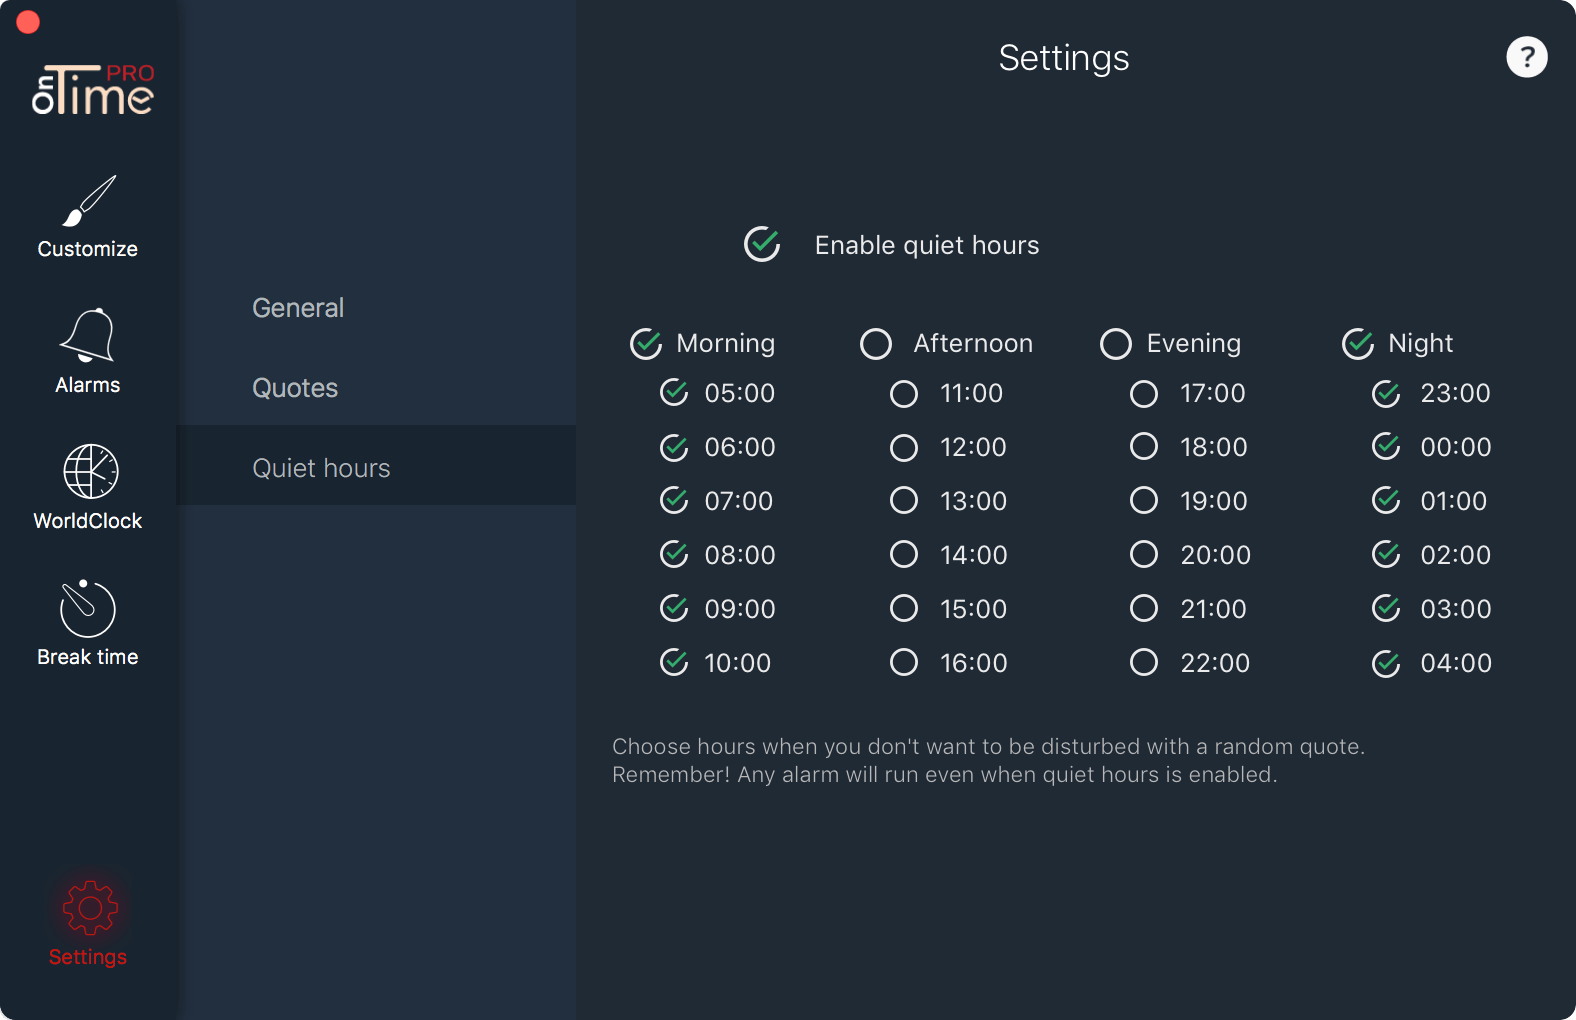
- Enable quiet hours - Enable or disable quiet hours.